Spring MVC Database Connectivity Example using Annotation and Java Based Configuration
In this tutorial, we will learn how to connect Spring MVC application to the database using annotation and Java-based configuration. In Java base configuration we don’t need to create any XML file.
What we do here, we simply create the DriverManagerDataSource object and pass the database driver class name, URL, username, and password and returns its object. And in the controller class, we check whether database connection is created or not.
Similar Post: Spring MVC Database Connectivity using XML Configuration
Note:
DriverManagerDataSourceclass is provided by Spring framework itself. You can use any third party API for connection pooling like DBCP, CP30, etc.
Dependency Required
To connect Spring MVC application to the database, you need the following dependencies.
<dependencies>

		<!-- spring mvc dependency -->
		<dependency>
			<groupId>org.springframework</groupId>
			<artifactId>spring-webmvc</artifactId>
			<version>5.0.2.RELEASE</version>
		</dependency>

		<!-- spring jdbc dependency -->
		<dependency>
			<groupId>org.springframework</groupId>
			<artifactId>spring-jdbc</artifactId>
			<version>5.0.2.RELEASE</version>
		</dependency>

		<!-- mysql databse connector -->
		<dependency>
			<groupId>mysql</groupId>
			<artifactId>mysql-connector-java</artifactId>
			<version>6.0.6</version>
		</dependency>

</dependencies>
Technology Use
Find the list of all technologies used in this application.
- Eclipse Oxygen
- Tomcat 9
- JDK 8
- Maven 3
- Spring5.0.2.RELEASE
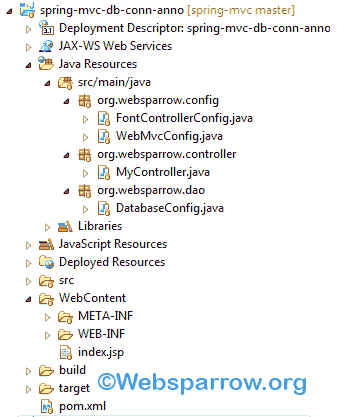
Project Structure
Final project structure of our application in Eclipse IDE will look like as follows.
Register Front Controller and Enable Spring MVC
We are using Java-based configuration so we don’t need to create any XML configuration but we configure it through the annotation.
package org.websparrow.config;

import org.springframework.web.servlet.support.AbstractAnnotationConfigDispatcherServletInitializer;

public class FontControllerConfig extends AbstractAnnotationConfigDispatcherServletInitializer {

	@Override
	protected Class<?>[] getRootConfigClasses() {

		return new Class[] { WebMvcConfig.class };
	}

	@Override
	protected Class<?>[] getServletConfigClasses() {

		return null;
	}

	@Override
	protected String[] getServletMappings() {
		return new String[] { "/" };
	}
}package org.websparrow.config;
import org.springframework.context.annotation.Bean;
import org.springframework.context.annotation.ComponentScan;
import org.springframework.context.annotation.Configuration;
import org.springframework.web.servlet.config.annotation.EnableWebMvc;
import org.springframework.web.servlet.view.InternalResourceViewResolver;
@Configuration
@EnableWebMvc
@ComponentScan(basePackages = { "org.websparrow.controller", "org.websparrow.dao" })
public class WebMvcConfig {
@Bean
public InternalResourceViewResolver viewResolver() {
InternalResourceViewResolver vr = new InternalResourceViewResolver();
vr.setPrefix("/");
vr.setSuffix(".jsp");
return vr;
}
}Database Access Object
Create a DatabaseConfig class that established the database connection.
package org.websparrow.dao;

import org.springframework.context.annotation.Bean;
import org.springframework.context.annotation.Configuration;
import org.springframework.jdbc.datasource.DriverManagerDataSource;

@Configuration
public class DatabaseConfig {

	@Bean
	public DriverManagerDataSource getDataSource() {

		DriverManagerDataSource bds = new DriverManagerDataSource();
		bds.setDriverClassName("com.mysql.jdbc.Driver");
		bds.setUrl("jdbc:mysql://localhost:3306/websparrow");
		bds.setUsername("root");
		bds.setPassword("");

		return bds;
	}
}
Controller
Create controller class handles user to request to check whether the application is established a connection or not. Learn more about @Autowired annotation.
package org.websparrow.controller;

import java.sql.SQLException;

import javax.sql.DataSource;

import org.springframework.beans.factory.annotation.Autowired;
import org.springframework.stereotype.Controller;
import org.springframework.web.bind.annotation.RequestMapping;
import org.springframework.web.servlet.ModelAndView;

@Controller
public class MyController {

	@Autowired
	private DataSource dataSource;

	@RequestMapping("/checkConnection")
	public ModelAndView greet() {

		try {
			if (dataSource.getConnection() != null) {

				return new ModelAndView("index", "msg", "Database Connection Successfully Established.");

			} else {

				return new ModelAndView("index", "msg", "Failed to connect database.");
			}
		} catch (SQLException e) {
			e.printStackTrace();

			return new ModelAndView("index", "msg", "Failed to connect database.");
		}
	}
}
View
JSP pages that visible to the user.
<html>
<body>
<h2>Spring MVC Database Connectivity Example</h2>
<b>Message:</b> ${msg}
</body>
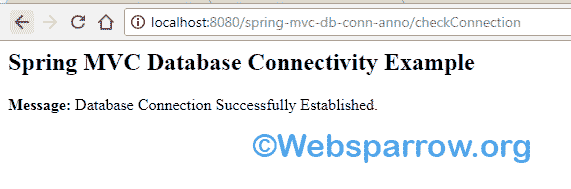
</html>Output:
Finally, run your application and check the below URL in your browser. You will get the following result on the JSP page.
URL: localhost:8080/spring-mvc-db-conn-anno/checkConnection
References
Download Source Code: spring-mvc-database-connectivity-example-using-annotation-and-java-based-configuration.zip
Similar Posts
- Spring MVC user registration and login example using JdbcTemplate + MySQL
- Spring Boot RESTful CRUD Example with MySQL Database
- JSP page/file is not rendering in Spring Boot application
- Spring @RestController, @GetMapping, @PostMapping, @PutMapping, and @DeleteMapping Annotation Example
- Spring RestTemplate vs RestClient