Spring 5 MVC Java Based Configuration Example
In the last two tutorials, we have learned how to create a Spring Web MVC application using XML-based configuration and annotation based configuration. But those tutorials have web.xml and dispatcher-servlet.xml file to initialize the front controller and annotations.
In this tutorial, we will see how to configure a Spring MVC application without using a web.xml and dive into the Java-based configuration.
These annotations will help to create a complete annotation based application.
@Configuration: Treat as the configuration file for Spring MVC-enabled applications.
@EnableWebMvc: Adding this annotation to a configuration class enable the Spring MVC configuration.
@ComponentScan: Scan starts from base package and registers all controllers, service, beans, etc.
@Bean: Indicates that a method produces a bean to be managed by the Spring container.
Technology Used
Find the list of technologies used in this application.
- Eclipse Photon IDE
- Java 8
- Tomcat 9
- Maven 4
- Spring.5.0.2. RELEASE
Dependency Required
To create Spring MVC application, you must need Spring MVC jars in your project build path and Maven is a great tool to do that. Add the following dependency to your pom.xml file.
<dependencies>
<dependency>
<groupId>org.springframework</groupId>
<artifactId>spring-webmvc</artifactId>
<version>5.0.2.RELEASE</version>
</dependency>
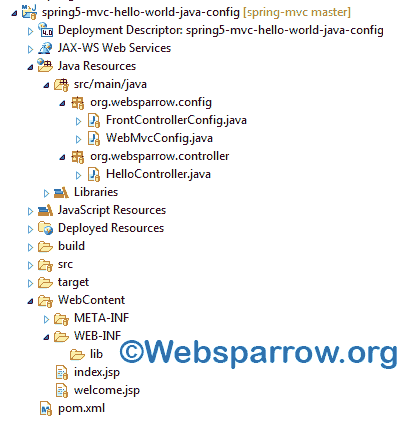
</dependencies>Project Structure
Final project structure of our application in Eclipse IDE will look like as follows.
Let’s start step by step.
Step 1: Replacing web.xml
Create FrontControllerConfig class that extends the AbstractAnnotationConfigDispatcherServletInitializer and implements its unimplemented methods.
This class is responsible to notify the Spring framework this our front controller i.e. register the DispatcherServlet and use Java-based Spring configuration.
getRootConfigClasses: Paas the Spring MVC configured class name.
getServletMappings: Paas the URL pattern i.e for which specific URL pattern you want to call this controller. In my case, I want to call all URL.
package org.websparrow.config;

import org.springframework.web.servlet.support.AbstractAnnotationConfigDispatcherServletInitializer;

public class FrontControllerConfig extends AbstractAnnotationConfigDispatcherServletInitializer {

	@Override
	protected Class<?>[] getRootConfigClasses() {

		return new Class[] { WebMvcConfig.class };
	}

	@Override
	protected Class<?>[] getServletConfigClasses() {

		return null;
	}

	@Override
	protected String[] getServletMappings() {
		return new String[] { "/" };
	}
}
Step 2: Enable Spring Web MVC
Create another class WebMvcConfig and this class will replace the dispatcher-servlet.xml file. This class is responsible for enabling Spring MVC and set the directory location of views and its extension.
package org.websparrow.config;

import org.springframework.context.annotation.Bean;
import org.springframework.context.annotation.ComponentScan;
import org.springframework.context.annotation.Configuration;
import org.springframework.web.servlet.config.annotation.EnableWebMvc;
import org.springframework.web.servlet.view.InternalResourceViewResolver;

@Configuration
@EnableWebMvc
@ComponentScan("org.websparrow.controller")
public class WebMvcConfig {

	@Bean
	public InternalResourceViewResolver viewResolver() {
		InternalResourceViewResolver vr = new InternalResourceViewResolver();

		// set location of views.
		vr.setPrefix("/");

		// set the extension of views.
		vr.setSuffix(".jsp");

		return vr;
	}
}
Step 3: Create Controller Class
Create a HelloController class that handles the user request and return the ModelAndView object.
package org.websparrow.controller;

import org.springframework.stereotype.Controller;
import org.springframework.web.bind.annotation.RequestMapping;
import org.springframework.web.bind.annotation.RequestParam;
import org.springframework.web.servlet.ModelAndView;

@Controller
public class HelloController {

	@RequestMapping("/hello")
	public ModelAndView greet(@RequestParam("name") String name) {

		ModelAndView mv = new ModelAndView();
		mv.setViewName("welcome");
		mv.addObject("name", name);

		return mv;
	}
}
Step 4: Create Views
index.jsp: This page will take the username and sends a request to the controller.
<!DOCTYPE html>
<html>

<body>

	<h2>Spring 5 MVC Java Based Configuration Example</h2>

	<form action="hello" method="post">

	Name: <input type="text" name="name" />
	      <input type="submit" value="Submit" />

	</form>

</body>
</html>welcome.jsp: This page will greet the user.
<%@ page language="java" contentType="text/html; charset=ISO-8859-1"
pageEncoding="ISO-8859-1" isELIgnored="false"%>
<!DOCTYPE html>
<html>
<body>
<h2>Hello ${name}</h2>
<p>Welcome to Spring MVC world.</p>
</body>
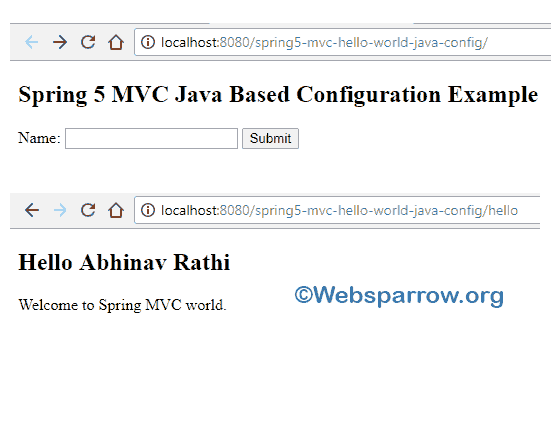
</html>Step 5: Run Application
Now start your tomcat and run the application. You will get the following results.
References
Download Source Code: spring-5-mvc-java-based-configuration-example.zip