Spring 5 MVC Hello World using Annotation
In the previous tutorial, we have created a simple Spring MVC hello world example by using XML configuration. But in this tutorial, we will create the same application using annotation. To do that the Spring framework provides @Controller and @RequestMapping annotation.
Annotation reduced the complexity of the application and most of the developer doesn’t like to manage XML files.
@Controller: Indicates that an annotated class is a Controller
.
@RequestMapping: Annotation for mapping web requests onto specific handler classes and/or handler methods.
@RequestParam: Annotation which indicates that a method parameter should be bound to a web request parameter.
In the next tutorial, we show you how to create Java-based Spring MVC configuration. In this case, we will not create a single XML file.
Technology Used
Find the list of all technologies that I have used in this application.
- Eclipse Photon IDE
- JDK 8
- Tomcat 9
- Spring.5.0.2. RELEASE
Dependency Required
To create Spring MVC application, you must need Spring MVC jars in your project build path and Maven is a great tool to do that. Add the following dependency to your pom.xml file.
<dependencies>
	<dependency>
		<groupId>org.springframework</groupId>
		<artifactId>spring-webmvc</artifactId>
		<version>5.0.2.RELEASE</version>
	</dependency>
</dependencies>
Project Structure
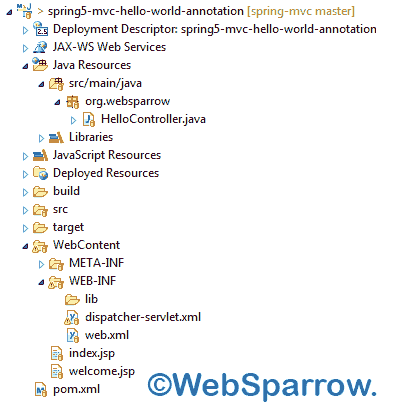
Final project structure of our application in Eclipse IDE will look like as follows.

Configure Front Controller
Add the Spring MVC front controller i.e. DispatcherServlet to your web.xml file.
<?xml version="1.0" encoding="UTF-8"?>
<web-app xmlns:xsi="http://www.w3.org/2001/XMLSchema-instance"
	xmlns="http://java.sun.com/xml/ns/javaee"
	xsi:schemaLocation="http://java.sun.com/xml/ns/javaee http://java.sun.com/xml/ns/javaee/web-app_2_5.xsd"
	id="WebApp_ID" version="2.5">
	<display-name>spring5-mvc-hello-world-annotation</display-name>
	<servlet>
		<servlet-name>dispatcher</servlet-name>
		<servlet-class>org.springframework.web.servlet.DispatcherServlet</servlet-class>
	</servlet>
	<servlet-mapping>
		<servlet-name>dispatcher</servlet-name>
		<url-pattern>*.htm</url-pattern>
	</servlet-mapping>
</web-app>
Create Controller
Create a HelloController class and add the @Controller annotation on the top of the class. And to handle the action request create a greet(name) method and add @RequestMapping annotation on the top of the method.
package org.websparrow;

import org.springframework.stereotype.Controller;
import org.springframework.web.bind.annotation.RequestMapping;
import org.springframework.web.bind.annotation.RequestParam;
import org.springframework.web.servlet.ModelAndView;

@Controller
public class HelloController {

	@RequestMapping("/hello.htm")
	public ModelAndView greet(@RequestParam("name") String name) throws Exception {

		ModelAndView mv = new ModelAndView();

		// name of JSP page
		mv.setViewName("welcome");

		// data that you want to show on JSP in form of key and value
		mv.addObject("name", name);

		return mv;
	}

}
Scan Packages
We have mapped action request to the controller using annotation so there is no need to map here but we need to tell front controller where is my controller. In this XML file, we only need to scan the packages.
<?xml version="1.0" encoding="UTF-8"?>
<beans xmlns="http://www.springframework.org/schema/beans"
	xmlns:xsi="http://www.w3.org/2001/XMLSchema-instance"
	xmlns:context="http://www.springframework.org/schema/context"
	xmlns:mvc="http://www.springframework.org/schema/mvc"
	xsi:schemaLocation="http://www.springframework.org/schema/beans
                           http://www.springframework.org/schema/beans/spring-beans.xsd
                           http://www.springframework.org/schema/context
                           http://www.springframework.org/schema/context/spring-context.xsd
                           http://www.springframework.org/schema/mvc
                           http://www.springframework.org/schema/mvc/spring-mvc.xsd">

	<context:annotation-config></context:annotation-config>
	<context:component-scan base-package="org.websparrow"></context:component-scan>

	<bean class="org.springframework.web.servlet.view.InternalResourceViewResolver">
		<property name="prefix" value="/" />
		<property name="suffix" value=".jsp" />
	</bean>

</beans>
View Components
Create the JSP pages that visible on the user machine.
index.jsp: This page will take the username and sends a request to the controller.
<html>
<body>

	<h2>Spring 5 MVC Hello World using Annotation</h2>

	<form action="hello.htm" method="post">

		Name: <input name="name" type="text" />
		      <input value="Submit" type="submit" />

	</form>

</body>
</html>
welcome.jsp: This page will greet the user.
<%@ page language="java" contentType="text/html; charset=ISO-8859-1"
	pageEncoding="ISO-8859-1" isELIgnored="false"%>
<!DOCTYPE html>
<html>
<body>

	<h2>Hello ${name}</h2>
	<p>Welcome to Spring MVC world.</p>

</body>
</html>
Run Application
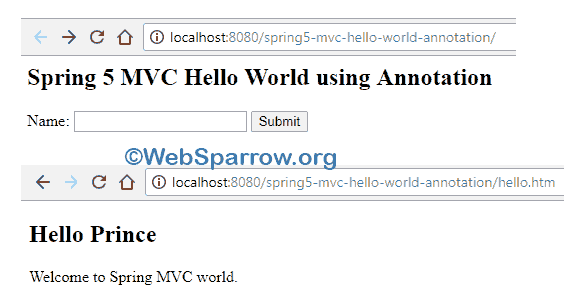
Finally, run your application and will get the following result.

References
Download Source Code: spring-5-mvc-hello-world-using-annotation.zip
Similar Posts
- Spring AOP After Returning Advice example using XML configuration
- Spring Data JPA Derived Query Methods Example
- Spring Boot RESTful Web Service with JPA and MySQL
- Spring Boot Dynamic DataSource Routing using AbstractRoutingDataSource
- Simplify Data Access with Spring’s @Repository Annotation
- Spring MVC @Controller, @RequestMapping, @RequestParam, and @PathVariable Annotation Example
- Microservices Configuration Management with Spring Boot
- How to fetch image from database using Spring MVC
- Spring dependency check using @Required annotation example
- Spring Boot- How to change default context path