Spring 5 Hello World Example
On this page, you will learn how to print Hello World or any other message on the console using Spring 5 framework.
This example will guide you step by step to develop the first program in Spring. Before staring all we need to download the Spring JAR file and configure it in Eclipse IDE.
Technologies Used
- Spring 5.0.2.RELEASE JAR
- Java 8
- Eclipse IDE
Dependencies Required
To developed core Spring application, you mainly required 5 JAR files as listed below.
- commons-logging-1.1.3.jar
- spring-beans-5.0.2.RELEASE.jar
- spring-context-5.0.2.RELEASE.jar
- spring-core-5.0.2.RELEASE.jar
- spring-expression-5.0.2.RELEASE.jar
You can also add the below dependency under the dependencies element if you are a Maven user.
<dependency>
    <groupId>org.springframework</groupId>
    <artifactId>spring-context</artifactId>
    <version>5.0.2.RELEASE</version>
</dependency>
Project Structure
Find the project structure in Eclipse IDE.
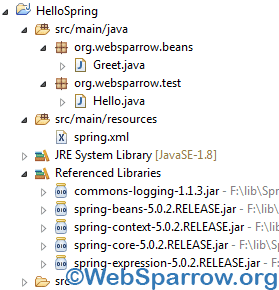
After setup, the Spring JAR in Eclipse IDE lets starts code step by step…
1- Spring Bean
Inside the beans package, create a simple class Greet that contains a method welcome().
package org.websparrow.beans;

public class Greet {

	public void welcome() {
		System.out.println("Welcome in Spring Framework.");
	}
}
2- Spring Bean Configuration
Configure the above Greet class in spring.xml file. Configuration file name can be anything. In my case, it was placed inside source folder src/main/resources.
<!DOCTYPE beans PUBLIC "-//SPRING//DTD BEAN 2.0//EN"
"http://www.springframework.org/dtd/spring-beans-2.0.dtd">
<beans>
	<bean id="sayHello" class="org.websparrow.beans.Greet"></bean>
</beans>
3- Execution
Now the final step executes the code. To execute the code we need to read the configuration file spring.xml and call them by using bean id.
package org.websparrow.test;

import org.springframework.context.ApplicationContext;
import org.springframework.context.support.ClassPathXmlApplicationContext;
import org.websparrow.beans.Greet;

public class Hello {
	public static void main(String[] args) {

		// read XML file
		@SuppressWarnings("resource")
		ApplicationContext context = new ClassPathXmlApplicationContext("spring.xml");

		// create Greet object
		Greet gt = (Greet) context.getBean("sayHello");
		gt.welcome();

	}
}When we execute the above code, it will print the following message in the console log.
Welcome in Spring Framework.Download Source Code: spring-5-hello-world-example