Spring Security JDBC authentication with Spring Boot
This page will walk through Spring Security JDBC authentication with Spring Boot and MySQL database. Spring Security offers lots of capabilities to perform JDBC authentication using an existing DataSource configuration. In JDBC based authentication user’s authentication and authorization information are stored in the database.
As you have already gone through our previous articles on role-based authorization you might be having basic knowledge of Spring Security.
Similar Post: Spring Boot + Spring Security with JPA authentication and MySQL
What we’ll build
In this example, we will create users with a different role and authenticate & authorized every request based on the logged-in user information stored in the MySQL database. To do that we need to do the following:
1. Capture the user information and store the password in hashed form
@Bean
public BCryptPasswordEncoder passwordEncoder() {
	return new BCryptPasswordEncoder();
}
2. Configure the JDBC authentication by overriding configure(AuthenticationManagerBuilder auth) method of class WebSecurityConfigurerAdapter
@Override
protected void configure(AuthenticationManagerBuilder auth) throws Exception {
	auth.jdbcAuthentication().dataSource(dataSource).passwordEncoder(passwordEncoder());
}
3. JdbcUserDetailsManager class is JDBC user management service to perform CRUD operations for both users and groups provided by Spring schema and it holds all the DML (Data Manipulation Language) and DQL (Data Query Language) commands.
@Bean
public JdbcUserDetailsManager jdbcUserDetailsManager() {
	return new JdbcUserDetailsManager(dataSource);
}
4. Authenticate the request based on the logged-in user role/roles by overriding configure(HttpSecurity http) method
@Override
protected void configure(HttpSecurity http) throws Exception {
	http.csrf().disable().authorizeRequests()
		.antMatchers("/admin").hasRole(ADMIN)
		.antMatchers("/user").hasAnyRole(ADMIN, USER)
		.antMatchers("/", "/register-user").permitAll()
		.and().formLogin();
}
In short:
- /register-user is used to create a new user and it is accessed by everyone.
- /admin can be accessed by a user has a role ‘ADMIN’ only.
- /user is allowed for a user has a role ‘ADMIN’ or ‘USER’.
- / (root) is allowed for everyone.
Technology Used
Find the list of all technologies used in this application.
- Spring Tool Suite 4
- JDK 8
- Spring Boot 2.1.8.RELEASE
- Spring Security 5.1.6.RELEASE
- MySQL Database
- Maven 3
Dependencies Required
To resolve the JAR dependency, add the following code to your pom.xml.
<dependencies>
<dependency>
<groupId>org.springframework.boot</groupId>
<artifactId>spring-boot-starter-data-jdbc</artifactId>
</dependency>
<dependency>
<groupId>org.springframework.boot</groupId>
<artifactId>spring-boot-starter-security</artifactId>
</dependency>
<dependency>
<groupId>org.springframework.boot</groupId>
<artifactId>spring-boot-starter-web</artifactId>
</dependency>
<dependency>
<groupId>mysql</groupId>
<artifactId>mysql-connector-java</artifactId>
<scope>runtime</scope>
</dependency>
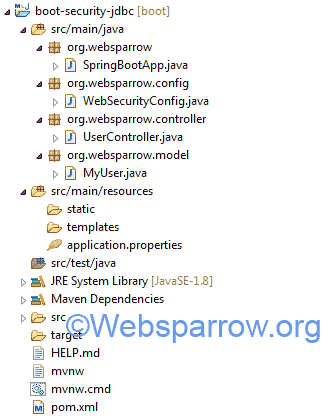
</dependencies>Project Structure
The final project structure of our application in STS 4 IDE will look like as follows:
Database Schema
The following table structure of the MySQL database is used to store user information and roles. As we are using JDBC, tables have to create manually.
-- users table structure
CREATE TABLE `users` (
  `username` VARCHAR(50) NOT NULL,
  `password` VARCHAR(120) NOT NULL,
  `enabled` TINYINT(1) NOT NULL,
  PRIMARY KEY (`username`)
);
-- authorities table structure
CREATE TABLE `authorities` (
  `username` VARCHAR(50) NOT NULL,
  `authority` VARCHAR(50) NOT NULL,
  KEY `username` (`username`),
  CONSTRAINT `authorities_ibfk_1` FOREIGN KEY (`username`)
  REFERENCES `users` (`username`)
);
application.properties
Configure the database connection strings in the application.properties file to established the connection between application and database.
#MySQL database connection strings
spring.datasource.url=jdbc:mysql://localhost:3306/spring_security
spring.datasource.username=root
spring.datasource.password=root
Model Class
Create a MyUser model class which holds all the attributes of a user.
package org.websparrow.model;

public class MyUser {

	private String userName;
	private String password;
	private String roles;

	// Generate Getters and Setters...
}
Controller Class
UserController class exposes the REST endpoint for the application user. In this controller class, we have created 4 different REST endpoints as follows:
- /register-user is used to create a new user and it is accessed by everyone.
- /admin can be accessed by a user has a role ‘ADMIN’ only.
- /user is allowed for a user has a role ‘ADMIN’ or ‘USER’.
- / (root) is allowed for everyone.
package org.websparrow.controller;

import java.util.ArrayList;
import java.util.List;

import org.springframework.beans.factory.annotation.Autowired;
import org.springframework.security.core.GrantedAuthority;
import org.springframework.security.core.authority.SimpleGrantedAuthority;
import org.springframework.security.core.userdetails.User;
import org.springframework.security.crypto.bcrypt.BCryptPasswordEncoder;
import org.springframework.security.provisioning.JdbcUserDetailsManager;
import org.springframework.web.bind.annotation.GetMapping;
import org.springframework.web.bind.annotation.PostMapping;
import org.springframework.web.bind.annotation.RequestBody;
import org.springframework.web.bind.annotation.RestController;
import org.websparrow.model.MyUser;

@RestController
public class UserController {

	@Autowired
	private JdbcUserDetailsManager jdbcUserDetailsManager;

	@Autowired
	private BCryptPasswordEncoder passwordEncoder;

	@PostMapping(value = "/register-user")
	public String regiter(@RequestBody MyUser myUser) {
		List<GrantedAuthority> authorities = new ArrayList<>();
		authorities.add(new SimpleGrantedAuthority(myUser.getRoles()));
		String encodededPassword = passwordEncoder.encode(myUser.getPassword());
		User user = new User(myUser.getUserName(), encodededPassword, authorities);
		jdbcUserDetailsManager.createUser(user);
		return "User created :)";
	}

	@GetMapping(value = "/admin")
	public String admin() {
		return "<h3>Welcome Admin :)</h3>";
	}

	@GetMapping(value = "/user")
	public String user() {
		return "<h3>Hello User :)</h3>";
	}

	@GetMapping(value = "/")
	public String welcome() {
		return "<h3>Welcome :)</h3>";
	}
}
Security Configuration
WebSecurityConfig is custom security configuration class which overrides the functionality of Spring Security provided by the WebSecurityConfigurerAdapter class. WebSecurityConfig class authenticate the user by overriding configure(AuthenticationManagerBuilder auth) method through the JDBC and authorized every requested based on logged-in user roles/permission by overriding configure(HttpSecurity http) method.
package org.websparrow.config;

import javax.sql.DataSource;

import org.springframework.beans.factory.annotation.Autowired;
import org.springframework.context.annotation.Bean;
import org.springframework.context.annotation.Configuration;
import org.springframework.security.config.annotation.authentication.builders.AuthenticationManagerBuilder;
import org.springframework.security.config.annotation.web.builders.HttpSecurity;
import org.springframework.security.config.annotation.web.configuration.EnableWebSecurity;
import org.springframework.security.config.annotation.web.configuration.WebSecurityConfigurerAdapter;
import org.springframework.security.crypto.bcrypt.BCryptPasswordEncoder;
import org.springframework.security.provisioning.JdbcUserDetailsManager;

@Configuration
@EnableWebSecurity
public class WebSecurityConfig extends WebSecurityConfigurerAdapter {

	private static final String ADMIN = "ADMIN";
	private static final String USER = "USER";

	@Autowired
	private DataSource dataSource;

	@Override
	protected void configure(AuthenticationManagerBuilder auth) throws Exception {
		auth.jdbcAuthentication().dataSource(dataSource)
            .passwordEncoder(passwordEncoder());
	}

	@Override
	protected void configure(HttpSecurity http) throws Exception {
		http.csrf().disable().authorizeRequests()
			.antMatchers("/admin").hasRole(ADMIN)
			.antMatchers("/user").hasAnyRole(ADMIN, USER)
			.antMatchers("/", "/register-user").permitAll()
			.and().formLogin();
	}

	@Bean
	public BCryptPasswordEncoder passwordEncoder() {
		return new BCryptPasswordEncoder();
	}

	@Bean
	public JdbcUserDetailsManager jdbcUserDetailsManager() {
		return new JdbcUserDetailsManager(dataSource);
	}
}
Run the application
The SpringBootApp class contains the main method and responsible to start the application.
package org.websparrow;

import org.springframework.boot.SpringApplication;
import org.springframework.boot.autoconfigure.SpringBootApplication;

@SpringBootApplication(scanBasePackages = "org.websparrow.*")
public class SpringBootApp {

	public static void main(String[] args) {
		SpringApplication.run(SpringBootApp.class, args);
	}
}
Test the application
To test the application, start the Spring Boot application by executing the above class and follow the below steps:
For /register-user page:
- Open the Postman.
- Hit the localhost:8080/register-user using HTTP method POST to register yourself as ROLE_ADMIN or ROLE_USER. JSON’s are provided below:
#JSON for ADMIN role { "userName":"superman", "password":"super", "roles":"ROLE_ADMIN" } #JSON for USER role { "userName":"ironman", "password":"iron", "roles":"ROLE_USER" } - On the successful user creation, you will able to message User created 🙂.
For /admin page:
- Hit the localhost:8080/admin, it will redirect you to the login page.
- Log in with the user has a role “ADMIN” and after successful authentication, it will show you the admin page.
- Similarly, try to access the admin URL with user don’t have the role of “ADMIN” (user has a role “USER“), Spring Security will block you to access the /admin page.
For /user page:
- Hit the localhost:8080/user, it will redirect you to the login page.
- Log in with the user has a role “USER” and after successful authentication, it will show you the user page.
- User has a role “ADMIN” can also access it.
For / (root)page:
- Spring Security allows localhost:8080/ URL to be accessed by everyone. It doesn’t require to be authenticated.
Download Source Code: spring-security-jdbc-authentication-with-spring-boot.zip
References
- Getting Started with Spring Security
- Spring Security Role Based Authorization Example
- Spring Security – Authorize Requests
- JdbcUserDetailsManager