Spring Boot + RabbitMQ Example
This post is about introduction on how to connect with RabbitMQ AMQP server using Spring Boot application and publish messages from the application to the RabbitMQ server.
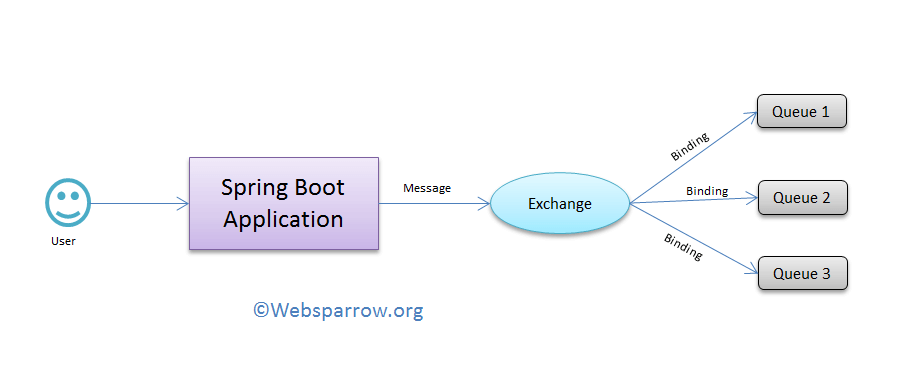
RabbitMQ is a message broker: it accepts and forwards messages. It implements the Advanced Message Queuing Protocol(AMQP) and written in Erlang programming language.
Before proceeding next make sure you have installed the RabbitMQ server on your local machine.
What we’ll build
We will build a Spring Boot application that published a message by using Spring AMQP’s RabbitTemplate.
What we’ll need
- About 30 minute
- JDK 1.8 or later
- Spring Boot 2.2.6.RELEASE
- Gradle 4+ or Maven 3.2+
- RabbitMQ Server 3.8.x
- Erlang 22.x
- Your favourite IDE:
- Spring Tool Suite (STS)
- Eclipse
- IntelliJ IDEA
Dependencies Required
Followings are the basic dependencies that required in setup Spring Boot + RabbitMQ, add them to your pom.xml.
<?xml version="1.0" encoding="UTF-8"?>
<project xmlns="http://maven.apache.org/POM/4.0.0" xmlns:xsi="http://www.w3.org/2001/XMLSchema-instance"
xsi:schemaLocation="http://maven.apache.org/POM/4.0.0 https://maven.apache.org/xsd/maven-4.0.0.xsd">
<modelVersion>4.0.0</modelVersion>
<parent>
<groupId>org.springframework.boot</groupId>
<artifactId>spring-boot-starter-parent</artifactId>
<version>2.2.6.RELEASE</version>
<relativePath /> <!-- lookup parent from repository -->
</parent>
<groupId>org.websparrow</groupId>
<artifactId>spring-boot-rabbit-mq</artifactId>
<version>0.0.1-SNAPSHOT</version>
<properties>
<java.version>1.8</java.version>
</properties>
<dependencies>
<dependency>
<groupId>org.springframework.boot</groupId>
<artifactId>spring-boot-starter-amqp</artifactId>
</dependency>
<dependency>
<groupId>org.springframework.boot</groupId>
<artifactId>spring-boot-starter-web</artifactId>
</dependency>
</dependencies>
<build>
<plugins>
<plugin>
<groupId>org.springframework.boot</groupId>
<artifactId>spring-boot-maven-plugin</artifactId>
</plugin>
</plugins>
</build>
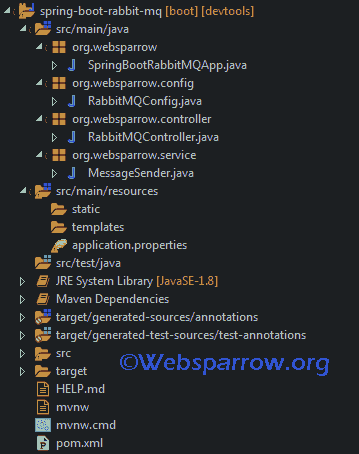
</project>Project Structure
The final project structure of our application in STS 4 IDE will look like as follows:
application.properties
application.properties file will be used to configure Rabbit MQ server details like port, host, username, and password. To publish messages, we need to set the exchange, queue and routing key details of AMQP.
#RabbitMQ Server properties
spring.rabbitmq.host= localhost
spring.rabbitmq.port= 5672
spring.rabbitmq.username= guest
spring.rabbitmq.password= guest

#AMQP properties
rabbitmq.exchange= websparrow.exchange
rabbitmq.queue= websparrow.queue
rabbitmq.routingKey= websparrow.routing.key
rabbitmq.exchange: Exchange name where producers publish their message.
rabbitmq.queue: Queue name where consumers receive the message.
rabbitmq.routingkey: Used to bind messages from the exchange to a particular queue.
Configuration
RabbitMQConfig class is used to configure exchange and queue for the RabbitMQ server and bind them together with the help of routing key.
package org.websparrow.config;

import org.springframework.amqp.*;
import org.springframework.beans.*;
import org.springframework.context.*;
import org.springframework.messaging.*;

@Configuration
public class RabbitMQConfig {

	@Value("${rabbitmq.queue}")
	private String queue;
	@Value("${rabbitmq.exchange}")
	private String exchange;
	@Value("${rabbitmq.routingkey}")
	private String routingKey;

	@Bean
	public TopicExchange getExchangeName() {
		return new TopicExchange(exchange);
	}

	@Bean
	public Queue getQueueName() {
		return new Queue(queue);
	}

	@Bean
	public Binding declareBinding() {
		return BindingBuilder.bind(getQueueName()).to(getExchangeName())
				.with(routingKey);
	}

	@Bean
	public Jackson2JsonMessageConverter getMessageConverter() {
		return new Jackson2JsonMessageConverter();

	}

	@Bean
	public RabbitTemplate rabbitTemplate(final ConnectionFactory factory) {
		final RabbitTemplate rabbitTemplate = new RabbitTemplate(factory);
		rabbitTemplate.setMessageConverter(getMessageConverter());
		return rabbitTemplate;
	}

	@Bean
	public MappingJackson2MessageConverter consumerJackson2MessageConverter() {
		return new MappingJackson2MessageConverter();
	}

	@Bean
	public DefaultMessageHandlerMethodFactory messageHandlerMethodFactory() {
		DefaultMessageHandlerMethodFactory factory = new DefaultMessageHandlerMethodFactory();
		factory.setMessageConverter(consumerJackson2MessageConverter());
		return factory;
	}

	public String getRoutingKey() {
		return routingKey;
	}

	public String getQueue() {
		return queue;
	}

	public String getExchange() {
		return exchange;
	}
}
Service
MessageSender class will be used to publish a message from exchange to the queue using RabbitTemplate.
package org.websparrow.service;

import org.springframework.amqp.rabbit.core.RabbitTemplate;
import org.springframework.stereotype.Service;

@Service
public class MessageSender {

	public void sendMessage(RabbitTemplate template, String exchange, Object data,
			String key) {

		template.convertAndSend(exchange, key, data);
	}
}
Controller
RabbitMQController will expose the endpoint for providing data that need to be published on the RabbitMQ server.
package org.websparrow.controller;

import org.springframework.amqp.rabbit.core.RabbitTemplate;
import org.springframework.beans.factory.annotation.Autowired;
import org.springframework.web.*;
import org.websparrow.config.RabbitMQConfig;
import org.websparrow.service.MessageSender;

@RestController
public class RabbitMQController {

	@Autowired
	private MessageSender messageSender;
	@Autowired
	private RabbitMQConfig rabbitMQConfig;
	@Autowired
	private RabbitTemplate rabbitTemplate;

	@PostMapping("/send-message")
	public Object sendMessage(@RequestBody String message) {

		messageSender.sendMessage(rabbitTemplate, rabbitMQConfig.getExchange(),
				message, rabbitMQConfig.getRoutingKey());

		return "Message sent <" + message + ">";
	}
}
Start the application
The SpringBootRabbitMQApp class contains the main method and responsible to start the application.
package org.websparrow;

import org.springframework.boot.SpringApplication;
import org.springframework.boot.autoconfigure.SpringBootApplication;

@SpringBootApplication
public class SpringBootRabbitMQApp {

	public static void main(String[] args) {
		SpringApplication.run(SpringBootRabbitMQApp.class, args);
	}
}
Test the application
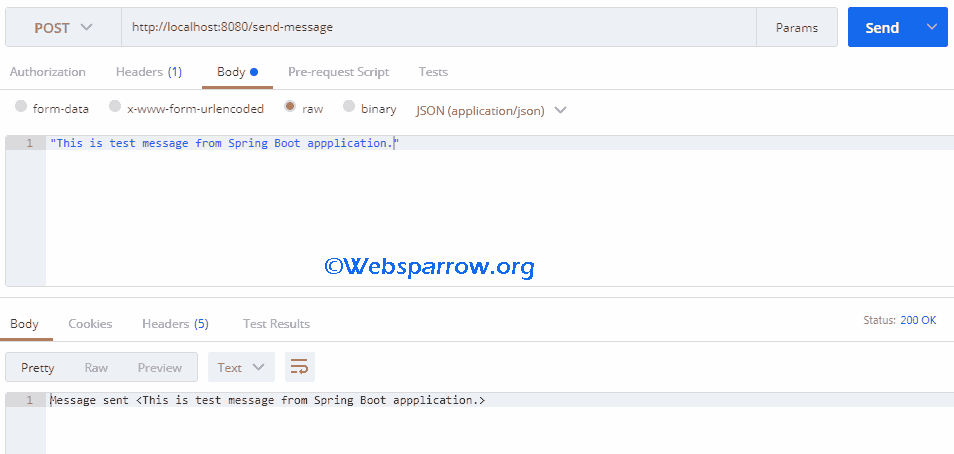
To test the application, start the Spring Boot application by executing the above class and follow the below steps:
1. Open Postman client and hit the below URL with POST request.
URL: localhost:8080/send-message
Message: <Anything that you want to publish.>
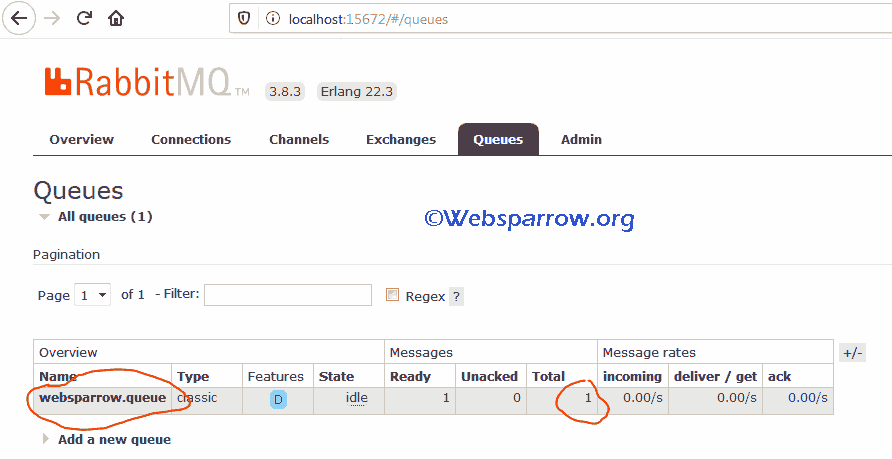
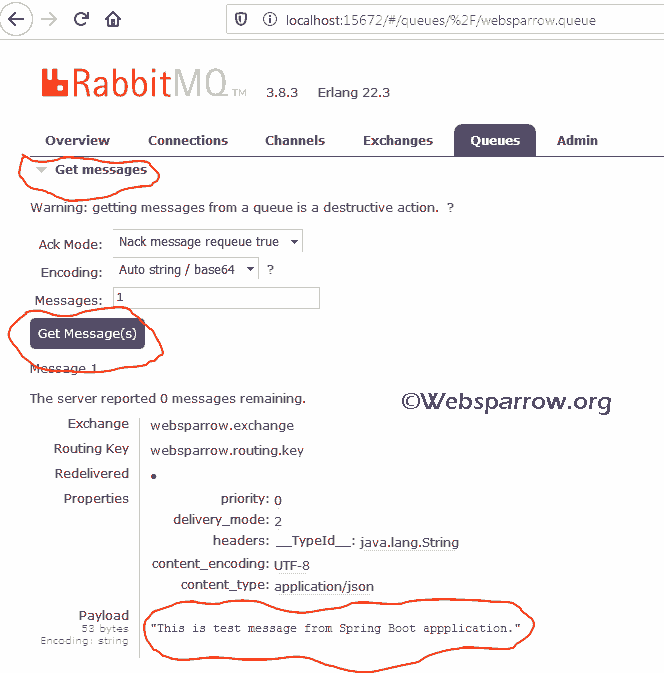
2. Login to your RabbitMQ server console at localhost:15672. The default username and password is guest.
3. Click on the Queues tab and you will find there is a message in the queue.
4. To check the message content, click on the Queue name<websparrow.queue> » Get messages.
Download Source Code: spring-boot-rabbitmq-example.zip
References
- Messaging with RabbitMQ
- RabbitMQ tutorial -“Hello World”
- @ConfigurationProperties Annotation in Spring Boot