Microservices Configuration Management with Spring Boot
In this article, we’re going to look at Configuration Management in Microservices with Spring Boot + Spring Cloud Config Server. While working on microservices we have the challenge to manage configuration for multiple microservices which have multiple instances.
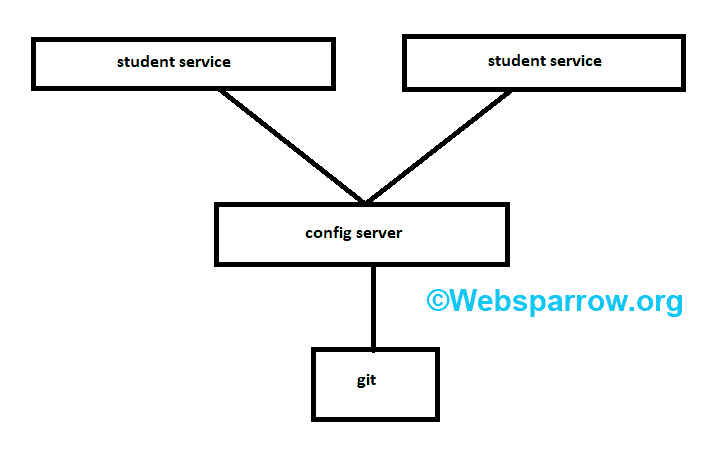
To solve this problem, we are going to use the Spring Cloud Config which is a project under the Spring Cloud umbrella. Spring Cloud Config provides an approach to store all configuration of microservices in a git repository.
Spring Cloud Config provides server-side and client-side support for externalized configuration in a distributed system. With the Config Server, you have a central place to manage external properties for applications across all environments.
1. What we’ll build
In this tutorial, we will create a config server which will provide configuration for other microservices from a git repository. We will store our application.properties file on a git repository and create two Spring Boot application:
- config-server
- student-service
After that, we will change the application.properties values on the fly and application will read it without restarting.

2. What we’ll need
- About 30 minute
- JDK 1.8 or later
- Spring Boot 2.2.6.RELEASE
- Spring Cloud Server & Config
- Gradle 4+ or Maven 3.2+
- Your favourite IDE:
- Spring Tool Suite (STS)
- Eclipse
- IntelliJ IDEA
3. Student Service
Create a student-service project and follow the below steps:
3.1 Dependencies Required
Add the below dependencies to your pom.xml file of the student-service project.
<?xml version="1.0" encoding="UTF-8"?>
<project xmlns="http://maven.apache.org/POM/4.0.0" xmlns:xsi="http://www.w3.org/2001/XMLSchema-instance"
	xsi:schemaLocation="http://maven.apache.org/POM/4.0.0 https://maven.apache.org/xsd/maven-4.0.0.xsd">
	<modelVersion>4.0.0</modelVersion>
	<parent>
		<groupId>org.springframework.boot</groupId>
		<artifactId>spring-boot-starter-parent</artifactId>
		<version>2.2.6.RELEASE</version>
		<relativePath /> <!-- lookup parent from repository -->
	</parent>
	<groupId>org.websparrow</groupId>
	<artifactId>student-service</artifactId>
	<version>0.0.1-SNAPSHOT</version>
	<name>student-service</name>

	<properties>
		<java.version>1.8</java.version>
		<spring-cloud.version>Hoxton.SR3</spring-cloud.version>
	</properties>

	<dependencies>
		<dependency>
			<groupId>org.springframework.boot</groupId>
			<artifactId>spring-boot-starter-web</artifactId>
		</dependency>
		<dependency>
			<groupId>org.springframework.cloud</groupId>
			<artifactId>spring-cloud-starter-config</artifactId>
		</dependency>
		<dependency>
			<groupId>org.springframework.boot</groupId>
			<artifactId>spring-boot-starter-actuator</artifactId>
		</dependency>
		<dependency>
			<groupId>org.springframework.boot</groupId>
			<artifactId>spring-boot-configuration-processor</artifactId>
			<optional>true</optional>
		</dependency>
	</dependencies>

	<dependencyManagement>
		<dependencies>
			<dependency>
				<groupId>org.springframework.cloud</groupId>
				<artifactId>spring-cloud-dependencies</artifactId>
				<version>${spring-cloud.version}</version>
				<type>pom</type>
				<scope>import</scope>
			</dependency>
		</dependencies>
	</dependencyManagement>

	<build>
		<plugins>
			<plugin>
				<groupId>org.springframework.boot</groupId>
				<artifactId>spring-boot-maven-plugin</artifactId>
			</plugin>
		</plugins>
	</build>

</project>
3.2 Project Structure
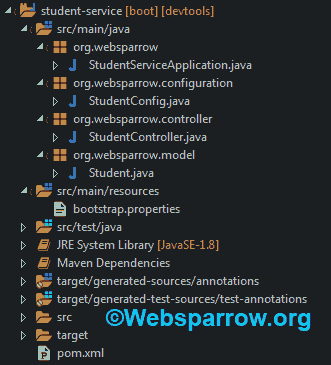
The final project structure of the student-service application in STS 4 IDE will look like as follows:

3.3 bootstrap.propertise
bootstrap.properties will set basic properties for application and other needful values used in the application will be provided by the Config Server.
# Name of the application
spring.application.name=student-service

# Config server URL
spring.cloud.config.uri=http://localhost:8000

# Profile name if any
# Check more about Profile
# https://websparrow.org/spring/spring-boot-profiles-and-configuration-management-example
spring.profiles.active=dev

#Spring Boot Actuator
management.endpoints.web.exposure.include=refresh
spring.cloud.config.uri= http://localhost:8000 → URL of the Config Server
spring.profiles.active= dev → Application can run on multiple environments so here we are set the active profile to dev. Check out more about Spring Boot Profile.
management.endpoints.web.exposure.include= refresh → exposing only to refresh endpoint of the actuator. So, we can use this endpoint to refresh the configuration on-demand, without restarting the JVM.
3.4 DTO
package org.websparrow.model;

public class Student {

	private Integer records;

	public Integer getRecords() {
		return records;
	}

	public Student(Integer records) {
		super();
		this.records = records;
	}

	public Student() {
		super();
	}
}
3.5 Configuration
Adds the field having prefix student in the properties file (for me its student-service-dev.properties in a separate repository) and creates a bean for StudentConfig class.
package org.websparrow.configuration;

import org.springframework.boot.context.properties.ConfigurationProperties;
import org.springframework.stereotype.Component;

@Component
@ConfigurationProperties(prefix = "student")
public class StudentConfig {

	private Integer records;

	public Integer getRecords() {
		return records;
	}

	public void setRecords(Integer records) {
		this.records = records;
	}
}
3.6 Controller
package org.websparrow.controller;

import org.springframework.beans.factory.annotation.Autowired;
import org.springframework.web.bind.annotation.GetMapping;
import org.springframework.web.bind.annotation.RestController;
import org.websparrow.configuration.StudentConfig;
import org.websparrow.model.Student;

@RestController
public class StudentController {

	@Autowired
	private StudentConfig studentConfig;

	@GetMapping("/student")
	public Student getStudent() {
		return new Student(studentConfig.getRecords());
	}
}
3.7 Spring Boot Starter
package org.websparrow;

import org.springframework.boot.SpringApplication;
import org.springframework.boot.autoconfigure.SpringBootApplication;

@SpringBootApplication(scanBasePackages = "org.websparrow.*")
public class StudentServiceApplication {

	public static void main(String[] args) {
		SpringApplication.run(StudentServiceApplication.class, args);
	}
}
4. Git Repository for Properties Files
In this step, we will create 3 property file for our student-service microservice in a separate repository.
Link: https://github.com/luciferMF/config-server-properties
student.records=100
management.security.enabled=false
management.security.enabled= false → will disable security for accessing actuator endpoint. This property will be picked form student-service.properties file and others will be used from student-service-dev.properties file.
student.records=199student.records=5As we already set dev as the active profile for our student-service, student-service-dev.properties will be used.
Make sure application properties file name should start with the name you set in your application with
spring.application.namerefer to Step 3.3.
5. Config Server (Spring Cloud Config Server)
Set up a Config Server and build a client that consumes the configuration on startup and then refreshes the configuration without restarting the client.
5.1 Dependency Required
The required dependencies to set up Spring Cloud Config Server are the followings. Add them to pom.xml file of the config-server application.
<?xml version="1.0" encoding="UTF-8"?>
<project xmlns="http://maven.apache.org/POM/4.0.0" xmlns:xsi="http://www.w3.org/2001/XMLSchema-instance"
	xsi:schemaLocation="http://maven.apache.org/POM/4.0.0 https://maven.apache.org/xsd/maven-4.0.0.xsd">
	<modelVersion>4.0.0</modelVersion>
	<parent>
		<groupId>org.springframework.boot</groupId>
		<artifactId>spring-boot-starter-parent</artifactId>
		<version>2.2.6.RELEASE</version>
		<relativePath /> <!-- lookup parent from repository -->
	</parent>
	<groupId>org.websparrow</groupId>
	<artifactId>config-server</artifactId>
	<version>0.0.1-SNAPSHOT</version>
	<name>config-server</name>
	<description>config server</description>

	<properties>
		<java.version>1.8</java.version>
		<spring-cloud.version>Hoxton.SR3</spring-cloud.version>
	</properties>

	<dependencies>
		<dependency>
			<groupId>org.springframework.cloud</groupId>
			<artifactId>spring-cloud-config-server</artifactId>
		</dependency>
	</dependencies>

	<dependencyManagement>
		<dependencies>
			<dependency>
				<groupId>org.springframework.cloud</groupId>
				<artifactId>spring-cloud-dependencies</artifactId>
				<version>${spring-cloud.version}</version>
				<type>pom</type>
				<scope>import</scope>
			</dependency>
		</dependencies>
	</dependencyManagement>

	<build>
		<plugins>
			<plugin>
				<groupId>org.springframework.boot</groupId>
				<artifactId>spring-boot-maven-plugin</artifactId>
			</plugin>
		</plugins>
	</build>

</project>
3.2 Project Structure
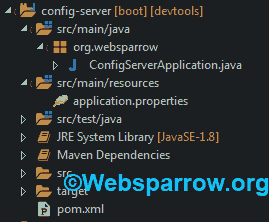
The final project structure of the config-server application in STS 4 IDE will look like as follows:

5.3 application.properties
spring.cloud.config.server.git.uri is used to set a repository URL. If you are using local directory as repository add file:// as the prefix to the path.
server.port=8000
spring.application.name=config-server
spring.cloud.config.server.git.uri=https://github.com/luciferMF/config-server-properties
5.4 Spring Boot Starter
Just annotate ConfigServerApplication class with @EnableConfigServer annotation and job is done. 🙂
package org.websparrow;

import org.springframework.boot.SpringApplication;
import org.springframework.boot.autoconfigure.SpringBootApplication;
import org.springframework.cloud.config.server.EnableConfigServer;

@EnableConfigServer
@SpringBootApplication
public class ConfigServerApplication {

	public static void main(String[] args) {
		SpringApplication.run(ConfigServerApplication.class, args);
	}
}
6. Testing
Follow the these below steps to test the application accurately.
1. Start your both application one by one. Make sure you start config-server first.
2. After the successful startup of both applications hit http://localhost:8080/student in Postman client/web browser. Response is:
{
    "records": 999
}
3. Now update the student-service-dev.properties file and commit your file and push it to the repository.
student.records=100Repository URL: https://github.com/luciferMF/config-server-properties
4. Before hitting the student-service (http://localhost:8080/student) again we must refresh it. Hit below URL with the Postman. It will refresh your properties in the application.
URL: http://localhost:8080/actuator/refresh
Method: POST
[
    "student.records",
    "config.client.version"
]
5. Again hit http://localhost:8080/student, you will get the updated response without restarting student-service.
{
    "records": 100
}
Download Source Code: microservices-configuration-management-with-spring-boot.zip
Alternatively, you can check out the project from below GitHub repositories:
- https://github.com/luciferMF/config-server-example
- https://github.com/luciferMF/config-server-properties
References
- Spring Cloud Config
- Centralized Configuration
- Spring Boot Profiles and Configuration Management Example
- Spring Boot Actuator: Overview and Getting Started