Spring Boot REST API File Upload/Save Example
This guide shows you how to upload/save a file using Spring Boot REST API. To upload files via HTTP multi-part requests will be handled by MultipartFile. It is a representation of an uploaded file received in a multipart request through which we can get the file contents and stored in the database or file system.
P.S. Tested on Windows environment.
What we’ll build
We will create a Spring Boot web application that accepts the file uploads and save files into the database or file system location.
Similar Posts:
Technology Used
Find the list of all technologies used in this application.
- Spring Tool Suite 4
- JDK 8
- Spring Boot 2.2.4.RELEASE
- Spring Data JPA 2.2.4.RELEASE
- MySQL Database
- Maven 3
Dependencies Required
These the basic dependencies that required in this application, add them to your pom.xml.
<?xml version="1.0" encoding="UTF-8"?>
<project xmlns="http://maven.apache.org/POM/4.0.0" xmlns:xsi="http://www.w3.org/2001/XMLSchema-instance"
	xsi:schemaLocation="http://maven.apache.org/POM/4.0.0 https://maven.apache.org/xsd/maven-4.0.0.xsd">
	<modelVersion>4.0.0</modelVersion>
	<parent>
		<groupId>org.springframework.boot</groupId>
		<artifactId>spring-boot-starter-parent</artifactId>
		<version>2.2.4.RELEASE</version>
		<relativePath/> <!-- lookup parent from repository -->
	</parent>
	<groupId>org.websparrow</groupId>
	<artifactId>spring-boot-upload-file</artifactId>
	<version>0.0.1-SNAPSHOT</version>

	<properties>
		<java.version>1.8</java.version>
	</properties>

	<dependencies>
		<dependency>
			<groupId>org.springframework.boot</groupId>
			<artifactId>spring-boot-starter-data-jpa</artifactId>
		</dependency>
		<dependency>
			<groupId>org.springframework.boot</groupId>
			<artifactId>spring-boot-starter-web</artifactId>
		</dependency>
		<dependency>
			<groupId>mysql</groupId>
			<artifactId>mysql-connector-java</artifactId>
			<scope>runtime</scope>
		</dependency>
	</dependencies>

	<build>
		<plugins>
			<plugin>
				<groupId>org.springframework.boot</groupId>
				<artifactId>spring-boot-maven-plugin</artifactId>
			</plugin>
		</plugins>
	</build>

</project>
1. Save in the File System
To save/copy/upload file in the system directory, follow the below steps;
- Get the bytes of the file which comes in HTTP multi-part request by calling
getBytes()method ofMultipartFileinterface. It returns the byte array of the file. - Prepare the path (directory location) where you want to save/copy/upload the file.
getOriginalFilename()method return original name of file. - Write byte array to the desired location via
Files.write(path, bytes);
@PostMapping("/directory")
public String uploadToDirectory(@RequestParam MultipartFile file) throws IOException {

	byte[] bytes = file.getBytes();
	Path path = Paths.get(DIR_TO_UPLOAD + file.getOriginalFilename());
	Files.write(path, bytes);

	return "File uploaded";
}
2. Save in the Database
Similarly, we can save the multi-part form data into the database table. We only need to take care of the column definition where we insert the file.
2.1 Entity
Suppose, we want to save id, name and profile photo of Prime Minister of India, so the entity class will look like:
package org.websparrow.entity;

import java.io.Serializable;

import javax.persistence.Entity;
import javax.persistence.GeneratedValue;
import javax.persistence.GenerationType;
import javax.persistence.Id;
import javax.persistence.Lob;
import javax.persistence.Table;

@Entity
@Table
public class PrimeMinisterOfIndia implements Serializable {

	private static final long serialVersionUID = 2842598520185366295L;
	@Id
	@GeneratedValue(strategy = GenerationType.IDENTITY)
	private Integer id;
	private String name;
	@Lob
	private byte[] photo;

	// Generate Getters and Setters...
}
Why
@Lobannotation used here? Because when want to store large dataset/file object into the database table, we need huge space. LOB stands for Large OBject and the maximum capacity of a LOB is (4 gigabytes-1) bytes.It will result the following SQL definition.
CREATE TABLE `prime_minister_of_india` (
  `id` int(11) NOT NULL AUTO_INCREMENT,
  `name` varchar(255) DEFAULT NULL,
  `photo` longblob,
  PRIMARY KEY (`id`)
);
2.2 Repository
package org.websparrow.repository;

import org.springframework.data.jpa.repository.JpaRepository;
import org.springframework.stereotype.Repository;
import org.websparrow.entity.PrimeMinisterOfIndia;

@Repository
public interface FileUploadRepository extends
	JpaRepository<PrimeMinisterOfIndia, Integer> {

}
2.3 Controller
The first step is the same we discussed above:
- Get the
bytesof the file. - Set the HTTP multi-part form data to an entity.
- Call the
save(Entity e)method of the Spring DataJpaRepositoryinterface.
@PostMapping(value = "/database")
public String uploadToDatabase(@RequestParam String name, @RequestParam MultipartFile file)
		throws IOException {

	// Set the form data into entity
	PrimeMinisterOfIndia pmOfIndia = new PrimeMinisterOfIndia();
	pmOfIndia.setName(name);
	pmOfIndia.setPhoto(file.getBytes());

	// Save the records into the database
	fileUploadRepository.save(pmOfIndia);

	return "Records saved into database.";
}
Here is the complete controller class which caters the both 1. Upload file to classpath/system directory and 2. Inter the form data and file into the database table.
package org.websparrow.controller;

import java.io.IOException;
import java.nio.file.Files;
import java.nio.file.Path;
import java.nio.file.Paths;

import org.springframework.beans.factory.annotation.Autowired;
import org.springframework.web.bind.annotation.PostMapping;
import org.springframework.web.bind.annotation.RequestMapping;
import org.springframework.web.bind.annotation.RequestParam;
import org.springframework.web.bind.annotation.RestController;
import org.springframework.web.multipart.MultipartFile;
import org.websparrow.entity.PrimeMinisterOfIndia;
import org.websparrow.repository.FileUploadRepository;

@RestController
@RequestMapping("/upload/file")
public class FileUploadController {

	@Autowired
	private FileUploadRepository fileUploadRepository;

	private static final String DIR_TO_UPLOAD = "C:\\Users\\Atul\\Desktop\\sparrow\\";

	@PostMapping(value = "/database")
	public String uploadToDatabase(@RequestParam String name, @RequestParam MultipartFile file)
			throws IOException {

		// Set the form data into entity
		PrimeMinisterOfIndia pmOfIndia = new PrimeMinisterOfIndia();
		pmOfIndia.setName(name);
		pmOfIndia.setPhoto(file.getBytes());

		// Save the records into the database
		fileUploadRepository.save(pmOfIndia);

		return "Records saved into database.";
	}

	@PostMapping("/directory")
	public String uploadToDirectory(@RequestParam MultipartFile file) throws IOException {

		byte[] bytes = file.getBytes();
		Path path = Paths.get(DIR_TO_UPLOAD + file.getOriginalFilename());
		Files.write(path, bytes);

		return "File uploaded";
	}
}
Run the application
The SpringBootUploadFileAppication class contains the main method and responsible to start the application.
package org.websparrow;

import org.springframework.boot.SpringApplication;
import org.springframework.boot.autoconfigure.SpringBootApplication;

@SpringBootApplication
public class SpringBootUploadFileApplication {

	public static void main(String[] args) {
		SpringApplication.run(SpringBootUploadFileApplication.class, args);
	}
}
Test the application
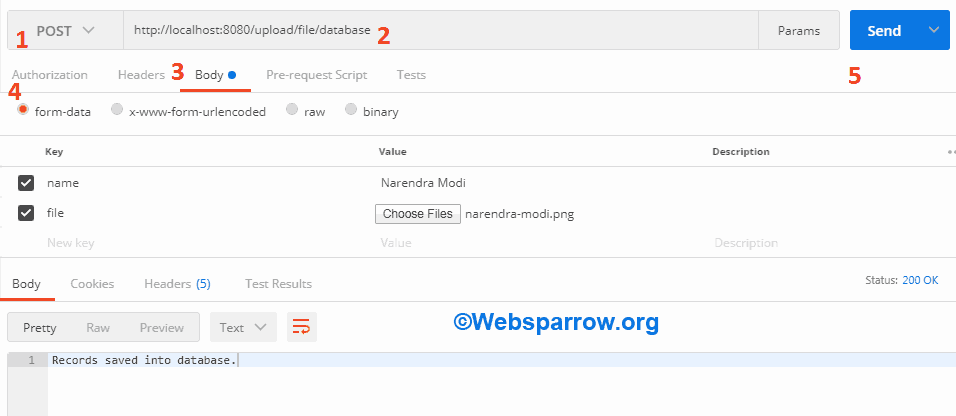
Let’s test the application, executing the above class and it will start the application then follow the below steps:
- Open the Postman client, select the HTTP POST method, enter your endpoint in the address bar.
- Click on the Body tab and check the form-data. Fill the data in key-value pair. And for file, select the file type from the dropdown list.
- Hit the Send button.
Download Source Code: spring-boot-rest-api-file-upload-save-example.zip
References
- Spring Boot- Uploading Files
- How to insert image in database using Spring MVC
- How to fetch image from database using Spring MVC
- Binary large object- Wikipedia