Spring Bean Life Cycle Management Example
In this tutorial, we will discuss how to interact with the container’s management of beans life cycle or what is the life cycle of a bean and how to manage it. In the spring bean lifecycle, initialization and destruction callbacks are involved. You can manage it and there are three possible ways to manage the lifecycle of beans. Every bean has life cycle i.e. bean started, bean running and finally bean destroyed.
Three ways to manage the lifecycle of beans in Spring framework.
- Programmatic approach
- XML-based approach
- Annotation approach
Technologies Used
Check the list of all technology which is used in our example.
- Spring-5.0.2.REALESE JARs
- JDK 8
- Eclipse Mars IDE
- Oracle 11g
Block Diagram of Spring Beans Life Cycle
This diagram will help you to understand how a bean traverse.
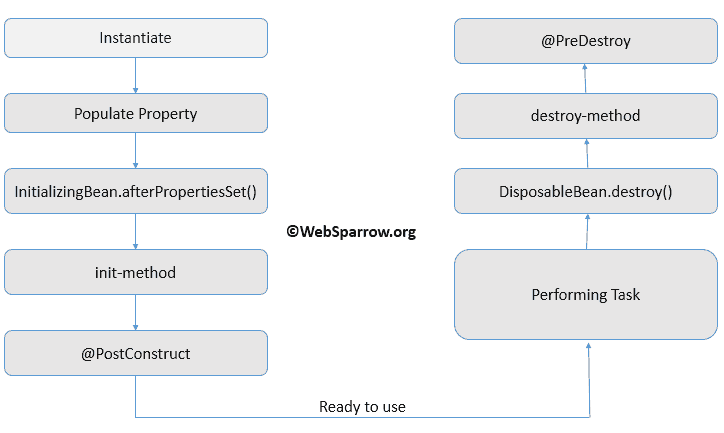
Table Structure
Find the table structure of EMPLOYE_DETAILS used in our example.
CREATE TABLE "EMPLOYEE_DETAILS" (
    "NAME"     VARCHAR2(30 BYTE),
    "EMAIL"    VARCHAR2(100 BYTE),
    "DEPT"     VARCHAR2(20 BYTE),
    "SALARY"   NUMBER(10,0)
);
In this example, I have used the database connection and treated it as a bean. To interact with the database and inserting some records first we create the connection object, then perform the insertion and finally close the connection.
Let’s see the complete example of all possible ways to manage the lifecycle of bean one by one.
1 Programmatic Approach
In this approach, the bean class implement the Spring InitializingBean and DisposableBean interfaces. These interfaces has the only one method afterPropertiesSet() and destroy() respectively.
The InitializingBean interface allows a bean to perform initialization work after all necessary properties on the bean have been set by the container and DisposableBean interface allows a bean to get a callback when the container containing it is destroyed.
1.1 Spring Beans
Create the Employee bean class, implement the InitializingBean and DisposableBean interfaces and override its methods.
public void afterPropertiesSet()– At the time of loading container will call this method. Use the inject values to create the Connection object.
public void save()– Now Connection object is ready. Use it to insert the employee records into the table.
public void destroy()– Close the Connection object when the task has been completed.
package org.websparrow.programmatic.beans;

import java.sql.Connection;
import java.sql.DriverManager;
import java.sql.PreparedStatement;

import org.springframework.beans.factory.DisposableBean;
import org.springframework.beans.factory.InitializingBean;

public class Employee implements InitializingBean, DisposableBean {

	// Generate setters method...
	private String driver, url, user, password;

	private Connection con;

	// Initialization operation
	@Override
	public void afterPropertiesSet() throws Exception {
		Class.forName(driver);
		con = DriverManager.getConnection(url, user, password);
		System.out.println("Debug--> database connection opened...");
	}

	// Task perform operation
	public void save(String name, String email, String dept, int salary) throws Exception {

		PreparedStatement ps = con.prepareStatement("INSERT INTO EMPLOYEE_DETAILS VALUES(?,?,?,?)");
		ps.setString(1, name);
		ps.setString(2, email);
		ps.setString(3, dept);
		ps.setInt(4, salary);
		ps.executeUpdate();

		System.out.println("Debug--> emplopyee records inserted...");
	}

	// Clean up operation
	@Override
	public void destroy() throws Exception {
		con.close();
		System.out.println("Debug--> database connection closed...");
	}
}
1.2 Spring Beans Configuration
In the configuration file, inject the value to create the Connection object like driver name, url, user name and password.
<?xml version="1.0" encoding="UTF-8"?>
<!DOCTYPE beans PUBLIC "-//SPRING//DTD BEAN 2.0//EN"
 "http://www.springframework.org/dtd/spring-beans-2.0.dtd">
<beans>

	<bean id="emp" class="org.websparrow.programmatic.beans.Employee">
		<property name="driver" value="oracle.jdbc.driver.OracleDriver" />
		<property name="url" value="jdbc:oracle:thin:@localhost:1521:xe" />
		<property name="user" value="root" />
		<property name="password" value="root" />
	</bean>

</beans>
1.3 Run it
Load the configuration file using ConfigurableApplicationContext interface and run it.
goes here.
package org.websparrow.test;

import java.util.Scanner;

import org.springframework.context.ConfigurableApplicationContext;
import org.springframework.context.support.ClassPathXmlApplicationContext;
import org.websparrow.programmatic.beans.Employee;

public class ProgrammaticClient {
	public static void main(String[] args) throws Exception {

		ConfigurableApplicationContext cap = new ClassPathXmlApplicationContext("spring-programmatic.xml");

		while (true) {
			System.out.println("Press 1 to SAVE the records and 2 for DESTROY");
			Scanner sc = new Scanner(System.in);
			int i = sc.nextInt();
			switch (i) {
			case 1:
				Employee emp = (Employee) cap.getBean("emp");
				emp.save("Diksha", "[email protected]", "Sales", 196261);
				break;

			default:
				cap.close();
				break;
			}
		}
	}
}
1.4 Output
Run the client class and you have seen at the time of loading container will create the connection object. Press 1 to save the employee record into the database and the press the 2 to close the connection object.
Mar 17, 2018 8:59:49 PM org.springframework.beans.factory.xml.XmlBeanDefinitionReader loadBeanDefinitions
INFO: Loading XML bean definitions from class path resource [spring-programmatic.xml]
Debug--> database connection opened...
Press 1 to SAVE the records and 2 for DESTROY
1
Debug--> emplopyee records inserted...
Press 1 to SAVE the records and 2 for DESTROY
2
Mar 17, 2018 9:00:15 PM org.springframework.context.support.ClassPathXmlApplicationContext doClose
INFO: Closing org.springframework.context.support.ClassPathXmlApplicationContext@4bf558aa: startup date [Sat Mar 17 20:59:49 IST 2018]; root of context hierarchy
Debug--> database connection closed...
Note: Spring will not recommended to use the
InitializingBeanandDisposableBeaninterfaces because it makes you Spring interface dependent.
2 XML-based Approach
In the XML-based approach, we don’t need to implement the InitializingBean and DisposableBean interfaces. Instead of these interface, we can use the init-method attribute to specify the name of the method that has a void no-argument signature for initialization and destroy-method attribute for clean-up of the <bean/> tag.
2.1 Spring Beans
I have used the above Employee bean class here but did not implement the spring interface. Here I have created three method to manage the life cycle of bean.
public void conInit()– This is a init method. It will call by the container at the time of loading. This method will be passed in the init-method attribute.
public void save()– Use it to insert the employee records into the table when connection abject is ready to use.
public void conCleanUp()– It similar to destroy() method. Pass the method name in the destroy-method attribute.
package org.websparrow.xml.beans;

import java.sql.Connection;
import java.sql.DriverManager;
import java.sql.PreparedStatement;

import org.springframework.beans.factory.DisposableBean;
import org.springframework.beans.factory.InitializingBean;

public class Employee {

	// Generate setters method...
	private String driver, url, user, password;

	private Connection con;

	// Initialization operation
	public void conInit() throws Exception {
		Class.forName(driver);
		con = DriverManager.getConnection(url, user, password);
		System.out.println("Debug--> database connection opened...");
	}

	// Task perform operation
	public void save(String name, String email, String dept, int salary) throws Exception {
		PreparedStatement ps = con.prepareStatement("INSERT INTO EMPLOYEE_DETAILS VALUES(?,?,?,?)");
		ps.setString(1, name);
		ps.setString(2, email);
		ps.setString(3, dept);
		ps.setInt(4, salary);
		ps.executeUpdate();
		System.out.println("Debug--> emplopyee records inserted...");
	}

	// Clean up operation
	public void conCleanUp() throws Exception {
		con.close();
		System.out.println("Debug--> database connection closed...");
	}
}
2.2 Spring Beans Configuration
In configuration file pass the name of the initializing method to the init-method attribute and destroy method name to the destroy-method attribute.
<?xml version="1.0" encoding="UTF-8"?>
<!DOCTYPE beans PUBLIC "-//SPRING//DTD BEAN 2.0//EN"
 "http://www.springframework.org/dtd/spring-beans-2.0.dtd">
<beans>

	<bean id="emp" class="org.websparrow.xml.beans.Employee" init-method="conInit" destroy-method="conCleanUp">
		<property name="driver" value="oracle.jdbc.driver.OracleDriver" />
		<property name="url" value="jdbc:oracle:thin:@localhost:1521:xe" />
		<property name="user" value="root" />
		<property name="password" value="root" />
	</bean>

</beans>
2.3 Run it
Load the configuration file and run it.
package org.websparrow.test;

import java.util.Scanner;

import org.springframework.context.ConfigurableApplicationContext;
import org.springframework.context.support.ClassPathXmlApplicationContext;
import org.websparrow.xml.beans.Employee;

public class XmlClient {
	public static void main(String[] args) throws Exception {

		ConfigurableApplicationContext cap = new ClassPathXmlApplicationContext("spring-xml.xml");

		while (true) {
			System.out.println("Press 1 to SAVE the records and 2 for DESTROY");
			Scanner sc = new Scanner(System.in);
			int i = sc.nextInt();
			switch (i) {
			case 1:
				Employee emp = (Employee) cap.getBean("emp");
				emp.save("Divya", "[email protected]", "IT", 19626);
				break;

			default:
				cap.close();
				break;
			}
		}
	}
}
2.4 Output
You will get the desired result based on your input.
Mar 17, 2018 9:06:44 PM org.springframework.beans.factory.xml.XmlBeanDefinitionReader loadBeanDefinitions
INFO: Loading XML bean definitions from class path resource [spring-xml.xml]
Debug--> database connection opened...
Press 1 to SAVE the records and 2 for DESTROY
1
Debug--> emplopyee records inserted...
Press 1 to SAVE the records and 2 for DESTROY
2
Mar 17, 2018 9:06:52 PM org.springframework.context.support.ClassPathXmlApplicationContext doClose
INFO: Closing org.springframework.context.support.ClassPathXmlApplicationContext@4bf558aa: startup date [Sat Mar 17 21:06:44 IST 2018]; root of context hierarchy
Debug--> database connection closed...
2.5 Default initialization and destroy methods
When you write initialization and destroy method callbacks that do not use the Spring-specific InitializingBean and DisposableBean callback interfaces, you typically write methods with names such as myInit(), myService, myDestroy(), and so on. Ideally, the names of such lifecycle callback methods are standardized across a project so that all developers use the same method names and ensure consistency.
The presence of the default-init-method attribute on the top-level <beans/> element attribute causes the Spring IoC container to recognize a method called myInit on beans as the initialization method callback. When a bean is created and assembled, if the bean class has such a method, it is invoked at the appropriate time. You configure destroy method callbacks similarly (in XML, that is) by using the default-destroy-method attribute on the top-level <beans/> element. Where existing bean classes already have callback methods that are named at variance with the convention, you can override the default by specifying (in XML, that is) the method name using the init-method and destroy-method attributes of the <beans/> itself.
Suppose that your initialization callback methods are named myInit(), and destroy callback methods are named myDestroy() then the following configuration file looks like…
<beans default-init-method="myInit" default-destroy-method="myDestroy">

	<bean id="emp" class="org.websparrow.xml.beans.Employee">
		<property name="driver" value="oracle.jdbc.driver.OracleDriver" />
		<property name="url" value="jdbc:oracle:thin:@localhost:1521:xe" />
		<property name="user" value="root" />
		<property name="password" value="root" />
	</bean>

</beans>
3 Annotation Approach
Spring bean life cycle can also be managed by using annotation. Spring provide two annotations @PostConstruct for initialization and @PreDestroy for clean-up. Put @PostConstruct annotation at the top of the method where you want to perform the initialization task and @PreDestroy where you want to perform destruction work. To activate these annotation you must need to initialize the CommonAnnotationBeanPostProcessor class.
3.1 Spring Beans
I have just copy the Employee class from the XML-based approach and put the @PostConstruct annotation at the top of the conInit() method to make it as init method and @PreDestroy at the top of the conCleanUp() method to make it as destroy method.
package org.websparrow.annotation.beans;

import java.sql.Connection;
import java.sql.DriverManager;
import java.sql.PreparedStatement;

import javax.annotation.PostConstruct;
import javax.annotation.PreDestroy;

import org.springframework.context.annotation.CommonAnnotationBeanPostProcessor;

public class Employee {

	// Generate setters method...
	private String driver, url, user, password;

	private Connection con;

	@PostConstruct
	public void conInit() throws Exception {
		Class.forName(driver);
		con = DriverManager.getConnection(url, user, password);
		System.out.println("Debug--> database connection opened...");
	}

	public void save(String name, String email, String dept, int salary) throws Exception {
		PreparedStatement ps = con.prepareStatement("INSERT INTO EMPLOYEE_DETAILS VALUES(?,?,?,?)");
		ps.setString(1, name);
		ps.setString(2, email);
		ps.setString(3, dept);
		ps.setInt(4, salary);
		ps.executeUpdate();
		System.out.println("Debug--> emplopyee records inserted...");
	}

	@PreDestroy
	public void conCleanUp() throws Exception {
		con.close();
		System.out.println("Debug--> database connection closed...");
	}

}
3.2 Spring Beans Configuration
Inside the configuration file activate the annotation by initializing CommonAnnotationBeanPostProcessor class and do the setter DI for Employee bean.
<?xml version="1.0" encoding="UTF-8"?>
<!DOCTYPE beans PUBLIC "-//SPRING//DTD BEAN 2.0//EN"
 "http://www.springframework.org/dtd/spring-beans-2.0.dtd">
<beans>

	<!-- activate annotation -->
	<bean class="org.springframework.context.annotation.CommonAnnotationBeanPostProcessor" />

	<bean id="emp" class="org.websparrow.annotation.beans.Employee">
		<property name="driver" value="oracle.jdbc.driver.OracleDriver" />
		<property name="url" value="jdbc:oracle:thin:@localhost:1521:xe" />
		<property name="user" value="root" />
		<property name="password" value="root" />
	</bean>

</beans>
3.3 Run it
Load the configuration file and run it.
package org.websparrow.test;

import java.util.Scanner;

import org.springframework.context.ConfigurableApplicationContext;
import org.springframework.context.support.ClassPathXmlApplicationContext;
import org.websparrow.annotation.beans.Employee;

public class AnnotationClient {
	public static void main(String[] args) throws Exception {

		ConfigurableApplicationContext cap = new ClassPathXmlApplicationContext("spring-annotation.xml");

		while (true) {
			System.out.println("Press 1 to SAVE the records and 2 for DESTROY");
			Scanner sc = new Scanner(System.in);
			int i = sc.nextInt();
			switch (i) {
			case 1:
				Employee emp = (Employee) cap.getBean("emp");
				emp.save("Kumkum", "[email protected]", "Sales", 19626);
				break;

			default:
				cap.close();
				break;
			}
		}
	}
}
3.4 Output
You will get the following result on your console log. Do check the database table also.
Mar 17, 2018 9:21:02 PM org.springframework.beans.factory.xml.XmlBeanDefinitionReader loadBeanDefinitions
INFO: Loading XML bean definitions from class path resource [spring-annotation.xml]
Debug--> database connection opened...
Press 1 to SAVE the records and 2 for DESTROY
1
Debug--> emplopyee records inserted...
Press 1 to SAVE the records and 2 for DESTROY
2
Mar 17, 2018 9:21:10 PM org.springframework.context.support.ClassPathXmlApplicationContext doClose
INFO: Closing org.springframework.context.support.ClassPathXmlApplicationContext@4bf558aa: startup date [Sat Mar 17 21:21:02 IST 2018]; root of context hierarchy
Debug--> database connection closed...
How does it work?
Whenever you execute the code, Spring container will read the XML configuration file and create the Employee class object and inject the property via the setter method. After injecting the property Spring container will execute the initialization method. All this will happens at the loading time. And whenever you try to call close() method of ConfigurableApplicationContext container, it will call the destruction method.
Download Source Code: spring-bean-life-cycle-management-example