Spring Boot + Spring Security with JPA authentication and MySQL
This article is going to focus on the authentication process of Spring Security with JPA and MySQL database using Spring Boot. Authenticate the user information from the database through Spring Data JPA is an easy process.
As shared in the previous Spring Security authentication through JDBC, hope you have some basic understanding to work with Spring Security.
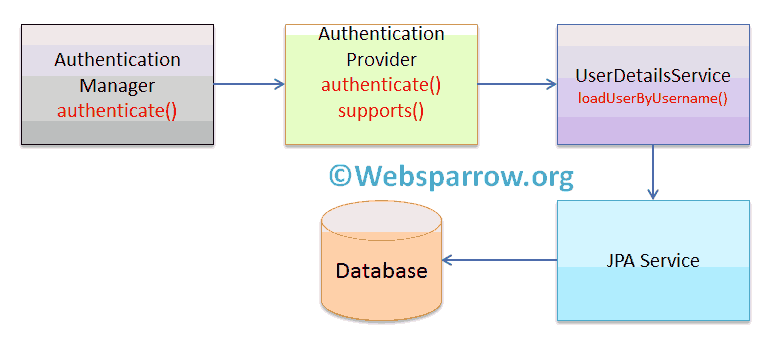
Let’s have a look, how Spring Security manage the authentication:
What you’ll build
You’ll build 3 REST service that will accept the HTTP GET request at:
1- http://localhost:8080/admin
2- http://localhost:8080/user
3- http://localhost:8080/all
and respond with an HTML representation of a greeting respectively:
1- Welcome Admin!
2- Welcome User!
3- Hello Everyone!
but before accessing the above service, a user must be authenticated with their credentials stored in the MySQL database:
@Override
protected void configure(AuthenticationManagerBuilder auth) throws Exception {
	auth.userDetailsService(userDetailsService);
}
and to fetch the user information from the database, override the loadUserByUsername(String userName) method of UserDetailsService interface provided by Spring Security itself.
@Override
public UserDetails loadUserByUsername(String userName) throws UsernameNotFoundException {

	Optional<User> user = userRepository.findByUserName(userName);

	user.orElseThrow(() -> new UsernameNotFoundException(userName + " not found."));

	return user.map(UserDetailsImpl::new).get();
}
after the successful authentication, the user must have valid permissions/roles to access the service:
@Override
protected void configure(HttpSecurity http) throws Exception {
	http.authorizeRequests()
		.antMatchers("/admin").hasRole(ADMIN)
		.antMatchers("/user").hasAnyRole(ADMIN,USER)
		.antMatchers("/all").permitAll()
		.and().formLogin();
}
What you’ll need
- About 30 minutes
- A favorite text editor or IDE
- JDK 1.8 or later
- Gradle 4+ or Maven 3.2+
- MySQL database
- You can also import the code straight into your IDE:
- Spring Tool Suite (STS)
- Eclipse
- IntelliJ IDEA
Dependencies Required
To work with Spring Data JPA and Spring Security, add the following dependencies to your pom.xml.
<dependencies>
<dependency>
<groupId>org.springframework.boot</groupId>
<artifactId>spring-boot-starter-data-jpa</artifactId>
</dependency>
<dependency>
<groupId>org.springframework.boot</groupId>
<artifactId>spring-boot-starter-security</artifactId>
</dependency>
<dependency>
<groupId>org.springframework.boot</groupId>
<artifactId>spring-boot-starter-web</artifactId>
</dependency>
<dependency>
<groupId>mysql</groupId>
<artifactId>mysql-connector-java</artifactId>
<scope>runtime</scope>
</dependency>
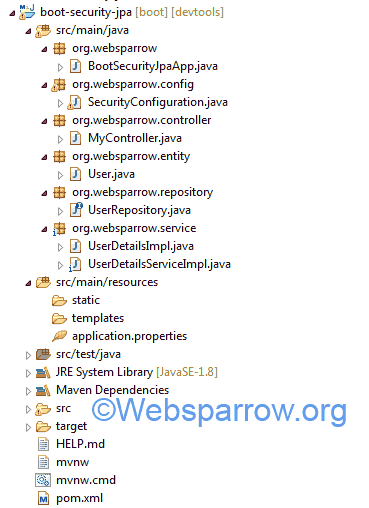
</dependencies>Project Structure
The final project structure of our application in STS 4 IDE will look like as follows:
Controller
MyController class exposes the REST endpoint for the application user. In this controller class, we have created 3 different REST endpoints as follows:
- /admin can be accessed by a user who has a role ‘ADMIN’ only.
- /user is allowed for a user has a role ‘ADMIN’ or ‘USER’.
- /all is allowed for everyone.
package org.websparrow.controller;

import org.springframework.web.bind.annotation.GetMapping;
import org.springframework.web.bind.annotation.RestController;

@RestController
public class MyController {

	@GetMapping("/admin")
	public String admin() {
		return "<h2>Welcome Admin!</h2>";
	}

	@GetMapping("/user")
	public String user() {
		return "<h2>Welcome User!</h2>";
	}

	@GetMapping("/all")
	public String all() {
		return "<h2>Hello Everyone!</h2>";
	}
}
Entity
User class is an entity class that represents the user table structure and holds all the necessary user information.
package org.websparrow.entity;

import javax.persistence.Entity;
import javax.persistence.GeneratedValue;
import javax.persistence.GenerationType;
import javax.persistence.Id;
import javax.persistence.Table;

@Entity
@Table(name = "user")
public class User {

	@Id
	@GeneratedValue(strategy = GenerationType.AUTO)
	private Integer id;
	private String userName;
	private String password;
	private boolean isActive;
	private String roles;

	// Generate Getters and Setters...
}
Repository
UserRepository interface is used to query with the database and fetch the user information. To do that, you have to create a derived findBy query method findByUserName(String userName).
package org.websparrow.repository;

import java.util.Optional;

import org.springframework.data.jpa.repository.JpaRepository;
import org.springframework.stereotype.Repository;
import org.websparrow.entity.User;

@Repository
public interface UserRepository extends JpaRepository<User, Integer> {

	Optional<User> findByUserName(String userName);
}
Service
UserDetailsServiceImpl is an implementation class of UserDetailsService interface provides by Spring Framework. You have to override its loadUserByUsername(String userName) method which returns an instance of the UserDetails interface.
package org.websparrow.service;

import java.util.Optional;

import org.springframework.beans.factory.annotation.Autowired;
import org.springframework.security.core.userdetails.UserDetails;
import org.springframework.security.core.userdetails.UserDetailsService;
import org.springframework.security.core.userdetails.UsernameNotFoundException;
import org.springframework.stereotype.Service;
import org.websparrow.entity.User;
import org.websparrow.repository.UserRepository;

@Service
public class UserDetailsServiceImpl implements UserDetailsService {

	@Autowired
	private UserRepository userRepository;

	@Override
	public UserDetails loadUserByUsername(String userName) throws UsernameNotFoundException {

		Optional<User> user = userRepository.findByUserName(userName);

		user.orElseThrow(() -> new UsernameNotFoundException(userName + " not found."));

		return user.map(UserDetailsImpl::new).get();
	}

}
UserDetailsImpl class implements the UserDetails interface to holds all the user information.
package org.websparrow.service;

import java.util.Arrays;
import java.util.Collection;
import java.util.List;
import java.util.stream.Collectors;

import org.springframework.security.core.GrantedAuthority;
import org.springframework.security.core.authority.SimpleGrantedAuthority;
import org.springframework.security.core.userdetails.UserDetails;
import org.websparrow.entity.User;

public class UserDetailsImpl implements UserDetails {

	private static final long serialVersionUID = 1L;

	private String userName;
	private String password;
	private boolean isActive;
	private List<GrantedAuthority> authorities;

	public UserDetailsImpl(User user) {
		this.userName = user.getUserName();
		this.password = user.getPassword();
		this.isActive = user.isActive();
		this.authorities = Arrays.stream(user.getRoles().split(","))
				.map(SimpleGrantedAuthority::new)
				.collect(Collectors.toList());
	}

	public UserDetailsImpl() {}

	@Override
	public Collection<? extends GrantedAuthority> getAuthorities() {
		return authorities;
	}

	@Override
	public String getPassword() {
		return password;
	}

	@Override
	public String getUsername() {

		return userName;
	}

	@Override
	public boolean isAccountNonExpired() {
		return true;
	}

	@Override
	public boolean isAccountNonLocked() {
		return true;
	}

	@Override
	public boolean isCredentialsNonExpired() {
		return true;
	}

	@Override
	public boolean isEnabled() {
		return isActive;
	}

}
Spring Security Java Configuration
Create a Spring Security configuration class that extends WebSecurityConfigurerAdapter. By adding @EnableWebSecurity, you get Spring Security support. Overrides its configure(AuthenticationManagerBuilder auth) method and call userDetailsService() method of AuthenticationManagerBuilder class, pass the UserDetailsService object and rest will automatically be managed by Spring Security.
package org.websparrow.config;

import org.springframework.beans.factory.annotation.Autowired;
import org.springframework.context.annotation.Bean;
import org.springframework.security.config.annotation.authentication.builders.AuthenticationManagerBuilder;
import org.springframework.security.config.annotation.web.builders.HttpSecurity;
import org.springframework.security.config.annotation.web.configuration.EnableWebSecurity;
import org.springframework.security.config.annotation.web.configuration.WebSecurityConfigurerAdapter;
import org.springframework.security.core.userdetails.UserDetailsService;
import org.springframework.security.crypto.password.NoOpPasswordEncoder;
import org.springframework.security.crypto.password.PasswordEncoder;

@EnableWebSecurity
public class SecurityConfiguration extends WebSecurityConfigurerAdapter {

	private static final String ADMIN = "ADMIN";
	private static final String USER = "USER";

	@Autowired
	private UserDetailsService userDetailsService;

	@Override
	protected void configure(AuthenticationManagerBuilder auth) throws Exception {
		auth.userDetailsService(userDetailsService);
	}

	@Override
	protected void configure(HttpSecurity http) throws Exception {
		http.authorizeRequests().antMatchers("/admin").hasRole(ADMIN)
			.antMatchers("/user").hasAnyRole(ADMIN, USER)
			.antMatchers("/all").permitAll()
			.and().formLogin();
	}

	@Bean
	public PasswordEncoder getPasswordEncoder() {
		return NoOpPasswordEncoder.getInstance();
	}
}
Remember
1. Do not useNoOpPasswordEncoderto encode password in the production. We have used only for demonstration purposes.2. Spring Security is smart enough to manage most of the things, you don’t have to worry about it.
3. You can change the authentication anytime, whether you are using JDBC, text file, hardcoded value, etc. That’s the beauty of the Spring Security framework.
application.properties
Configure the database connection strings in the application.properties file to established the connection between application and database.
# MySQL database connection strings
spring.datasource.url=jdbc:mysql://localhost:3306/demo
spring.datasource.username=root
spring.datasource.password=root

# JPA property settings
spring.jpa.hibernate.ddl-auto=update
spring.jpa.properties.hibernate.show_sql=true
Run the application
The BootSecurityJpaApp class contains the main method and responsible to start the application.
package org.websparrow;

import org.springframework.boot.SpringApplication;
import org.springframework.boot.autoconfigure.SpringBootApplication;

@SpringBootApplication
public class BootSecurityJpaApp {

	public static void main(String[] args) {
		SpringApplication.run(BootSecurityJpaApp.class, args);
	}
}
Test the application
To test the application, start the Spring Boot application by executing the above class and follow the below steps:
Load the user information:
- By executing the below SQL script, 2 dummy user will be inserted into your database:
insert  into `user`(`id`,`is_active`,`password`,`roles`,`user_name`)
values (1,1,'user@123','ROLE_USER','user'),
(2,1,'admin@123','ROLE_ADMIN','admin');
For /admin page:
- Hit the localhost:8080/admin, it will redirect you to the login page.
- Log in with the user has a role “ADMIN” and after successful authentication, it will show you the admin page.
- Similarly, try to access the admin URL with user don’t have the role of “ADMIN” (user has a role “USER“), Spring Security will block you to access the /admin page.
For /user page:
- Hit the localhost:8080/user, it will redirect you to the login page.
- Log in with the user has a role “USER” and after successful authentication, it will show you the user page.
- User has a role “ADMIN” can also access it.
For /all page:
- Spring Security allows localhost:8080/all URL to be accessed by everyone. It doesn’t require to be authenticated.
Summary
Congratulations! You’ve just developed a Spring Security JPA authentication with MySQL database using Spring Boot.
Download Source Code: spring-boot-spring-security-with-jpa-authentication-and-mysql.zip
References
- Getting Started with Spring Security
- Spring Security Role Based Authorization Example
- Spring Security JDBC authentication with Spring Boot
- Spring Data derived findBy query methods example