Getting Started with Spring Security
Spring Security is just another module of Spring Framework family like Spring JDBC, Spring MVC, etc. Authentication, authorization and other security features for enterprise applications can be achieved by Spring Security. It is a highly customizable and access-control framework.
Why Spring Security?
Obviously, there will be a question that juggles your mind, why do we integrate Spring Security into our application? Well, your answer will be, Security is the most challenging part of any application whether it is a web-based application or desktop based application. To protect the application from an unauthorized user, data breach, SQL injection, etc, Security comes in the role. Spring Security gives us lots of things ready to use. We don’t need to build it manually.
For example, we have an application which contains some public and private pages and we want our private pages can be accessed by an authorized user only. To do that you need to validate the user credentials (userid, password) by redirecting them to a login page before they access the private pages. Once the user validated, show them the private pages as well.
Features of Spring Security
Some of Spring Security module features are listed below:
- Protection against attacks like session fixation, clickjacking, cross-site request forgery (CSRF), etc
- Comprehensive and extensible support for both Authentication and Authorization
- Integration with Spring Web MVC
- Servlet API integration
- Supports JAAS (Java Authentication and Authorization Service)
- “Remember-Me” Feature through HTTP Cookies
- Supports Both XML Configuration and Annotations
- WS-Security using Spring Web Services.
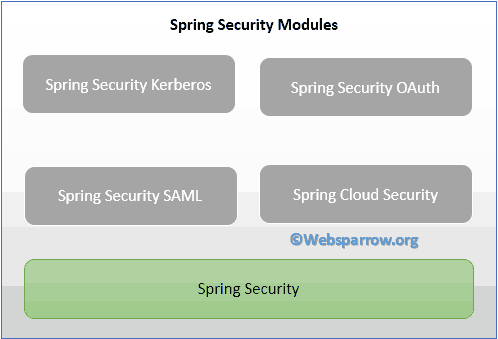
Spring Framework has the following modules to provide Security to the Spring-Based Applications:
- Spring Security
- Spring Security SAML
- Spring Security OAuth
- Spring Security Kerberos
- Spring Cloud Security
Let’s start to create a live example using Spring Security. Here we build a simple RESTful API that response some greet message. And to access the RESTful API, the user must be validated.
Note: By default, username for Spring Security based application is “user” and password will be printed in your console log followed bt “Using generated security password: <your-password>” text.
Technologies Used
Find the list of tools/technologies used in this application.
- STS 4
- JDK 8
- Spring Boot 2.1.2.RELEASE
- Maven 3
Dependencies Required
These are the required dependencies that must be your build path. To get all these dependencies all the following code in your pom.xml.
<?xml version="1.0" encoding="UTF-8"?>
<project xmlns="http://maven.apache.org/POM/4.0.0"
xmlns:xsi="http://www.w3.org/2001/XMLSchema-instance"
xsi:schemaLocation="http://maven.apache.org/POM/4.0.0 http://maven.apache.org/xsd/maven-4.0.0.xsd">
<modelVersion>4.0.0</modelVersion>
<parent>
<groupId>org.springframework.boot</groupId>
<artifactId>spring-boot-starter-parent</artifactId>
<version>2.1.2.RELEASE</version>
<relativePath /> <!-- lookup parent from repository -->
</parent>
<groupId>org.websparrow</groupId>
<artifactId>spring-security-demo</artifactId>
<version>0.0.1-SNAPSHOT</version>
<name>spring-security-demo</name>
<properties>
<java.version>1.8</java.version>
</properties>
<dependencies>
<dependency>
<groupId>org.springframework.boot</groupId>
<artifactId>spring-boot-starter-web</artifactId>
</dependency>
<!-- spring boot security dependency -->
<dependency>
<groupId>org.springframework.boot</groupId>
<artifactId>spring-boot-starter-security</artifactId>
</dependency>
</dependencies>
<build>
<plugins>
<plugin>
<groupId>org.springframework.boot</groupId>
<artifactId>spring-boot-maven-plugin</artifactId>
</plugin>
</plugins>
</build>
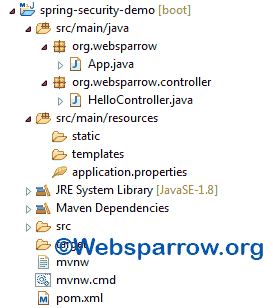
</project>Project Structure
Final project structure of our application in STS will look like as follows:
Controller Class
Simple controller class that response the greeting message.
package org.websparrow.controller;

import org.springframework.web.bind.annotation.RequestMapping;
import org.springframework.web.bind.annotation.RequestMethod;
import org.springframework.web.bind.annotation.RestController;

@RestController
public class HelloController {

	@RequestMapping(value = "/hello", method = RequestMethod.GET)
	public String hello() {

		return "Welcome to Spring Security tutorial :)";
	}
}
Execute it
Create an App class and run it.
package org.websparrow;

import org.springframework.boot.SpringApplication;
import org.springframework.boot.autoconfigure.SpringBootApplication;

@SpringBootApplication
public class App {

	public static void main(String[] args) {
		SpringApplication.run(App.class, args);
	}
}
Test the application
To the application run the App class and hit http://localhost:8080/hello URL in your web browser, ideally, it has to show the greeting message but it will redirect to the login page and ask user name and password. Here Spring Security comes in the picture.
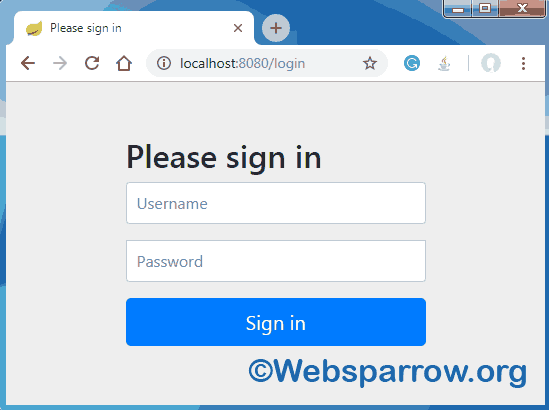
Remember: By default, username for Spring Security based application is “user” and password will be printed in your console log followed bt “Using generated security password: <your-password>” text.
Enter the username and password and you will able to the greeting message.
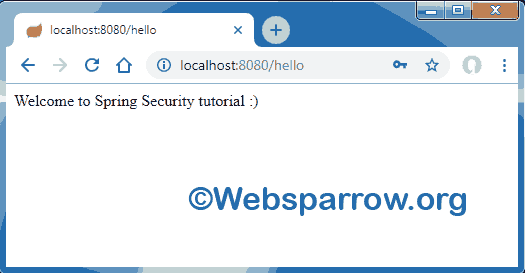
Done! That’s the beauty of Spring Security.
References
- Spring Security
- Wikipedia- Spring Security
- Spring Security Kerberos
- Spring Security OAuth
- Spring Security SAML
Download Source Code: getting-started-with-spring-security.zip