Spring Boot RESTful API Documentation with Swagger 2
This guide helps you to understand the integration of Spring Boot RESTful API Documentation with Swagger 2. Swagger 2 is an open source RESTful web service API documentation API and it can be easily integrated with your Spring Boot project. Swagger 2 supports of all types of HTTP request like GET, POST, PUT, etc.
In short, you can say that: Spring Boot makes developing RESTful web service very easy and Swagger makes documenting your RESTful web service super easy.
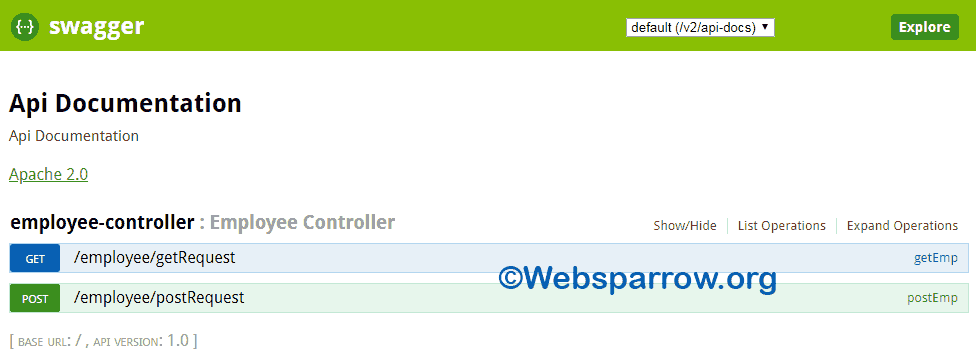
Swagger 2 UI display the API documentation on the web browser for other API developers or consumers to interact with the API’s resources without having any of the implementation logic.
What we’ll build
In this article, we will build very simple RESTful web service in Spring Boot which returns the employee details in JSON formats like id, name, salary, and company and configure the Swagger 2 for documenting our API’s. Swagger 2 list out your all RESTful API using in your project and the HTTP methods used in particular API.

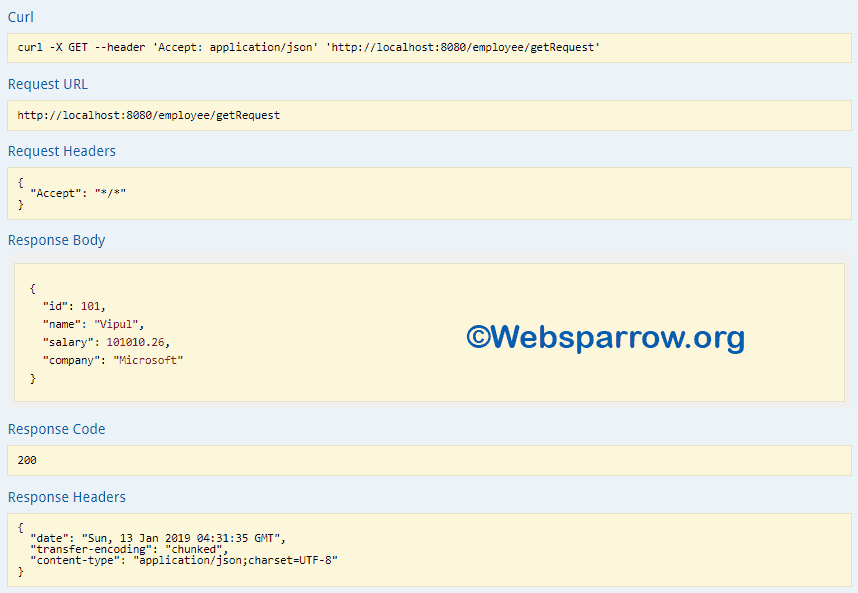
Expand the GET request of an employee REST API and click on the Try it out! button, it will show you the response of your REST API.

What we’ll need
To integrate the Swagger 2 in your Spring Boot project, you will need the Swagger core and UI jars. To get these jars, add the following dependencies in your pom.xml.
<!-- swagger 2 ui -->
<dependency>
	<groupId>io.springfox</groupId>
	<artifactId>springfox-swagger-ui</artifactId>
	<version>2.6.1</version>
</dependency>
<!-- swagger 2 core -->
<dependency>
	<groupId>io.springfox</groupId>
	<artifactId>springfox-swagger2</artifactId>
	<version>2.6.1</version>
</dependency>
Apart from these jars, find the list of technologies/tools used in this project.
- STS 4
- JDK 8
- Swagger 2
- Spring Boot 2.0.7.RELEASE
- Maven 3
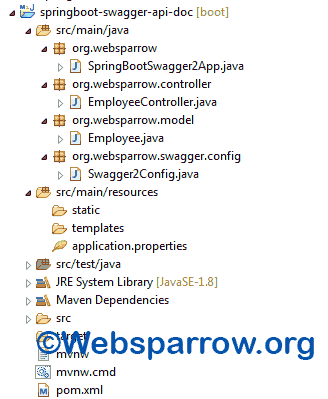
Project Structure
Final project structure of the application in STS will look like as follows:

1 Building Spring Boot RESTful API
Create a simple Spring Boot project in your favorite IDE, I have used STS, add the required dependencies of your project to develop your RESTful web service.
1.1 Model Class
Create an Employee model class with their attributes, and generate its getter and setters…
package org.websparrow.model;

public class Employee {

	// Getters and Setters...
	private int id;
	private String name;
	private float salary;
	private String company;
}
1.1 Controller Class
This EmployeeController class is responsible for handle your HTTP request and return the employee details in JSON formats. getEmp() method is for GET request and returns the hardcoded employee details and postEmp(@RequestBody Employee employee) method is for POST request and returns the whatever you entered employee details.
package org.websparrow.controller;

import org.springframework.web.bind.annotation.GetMapping;
import org.springframework.web.bind.annotation.PostMapping;
import org.springframework.web.bind.annotation.RequestBody;
import org.springframework.web.bind.annotation.RequestMapping;
import org.springframework.web.bind.annotation.RestController;
import org.websparrow.model.Employee;

@RestController
@RequestMapping("/employee")
public class EmployeeController {

	@GetMapping("/getRequest")
	public Employee getEmp() {

		Employee emp = new Employee();
		emp.setId(101);
		emp.setName("Vipul");
		emp.setSalary(101010.26f);
		emp.setCompany("Microsoft");

		return emp;
	}

	@PostMapping("/postRequest")
	public Employee postEmp(@RequestBody Employee employee) {
		return employee;
	}
}
2 Configuring Swagger 2
To configure Swagger 2 in your Spring Boot project, create a class Swagger2Config and enable the Swagger 2 by placing the @EnableSwagger2 annotation on the top of the class. @EnableSwagger2 annotation enables the Swagger in the class and should have an accompanying @Configuration annotation.
select() – initiates a builder for API selection and return API selection builder.
RequestHandlerSelectors.basePackage – predicate matches the base package to filter the API.
package org.websparrow.swagger.config;

import org.springframework.context.annotation.Bean;
import org.springframework.context.annotation.Configuration;

import springfox.documentation.builders.RequestHandlerSelectors;
import springfox.documentation.spi.DocumentationType;
import springfox.documentation.spring.web.plugins.Docket;
import springfox.documentation.swagger2.annotations.EnableSwagger2;

@Configuration
@EnableSwagger2
public class Swagger2Config {

	@Bean
	public Docket empApiDoc() {
		return new Docket(DocumentationType.SWAGGER_2).select()
				.apis(RequestHandlerSelectors.basePackage("org.websparrow.controller")).build();
	}
}
3 Deployment and Testing
We are almost done with our Spring Boot RESTful API Documentation using Swagger 2.
3.1 Deployment
To deploy your project on embedded Tomcat Server, create SpringBootSwagger2App class and Run As » Spring Boot App.
package org.websparrow;

import org.springframework.boot.SpringApplication;
import org.springframework.boot.autoconfigure.SpringBootApplication;

@SpringBootApplication
public class SpringBootSwagger2App {

	public static void main(String[] args) {
		SpringApplication.run(SpringBootSwagger2App.class, args);
	}
}
3.2 Testing
When your Tomcat Server has been started, follow the below steps to test the application:
- Hit the http://localhost:8080/swagger-ui.html URL in your favorite web browser. It will list out your all API’s.
- Select the API of your choice (in my case, I have only one). It will display the all HTTP method used in that API with their URL.
- Expand any URL of your choice. It shows you some information.
- Click on the Try it out! button, it will show you the response of your RESTful API.

4 References
Download Source Code: spring-boot-restful-api-documentation-using-swagger-2.zip