Spring Boot + Activiti Example
In this tutorial, we will demonstrate the Spring Boot + Activiti Example. Activiti is an open-source workflow engine that can execute business processes described in BPMN 2.0. Activiti engine has a core goal to take a process definition comprised of human tasks and service calls and execute those in a certain order.
1. What we’ll build
Here, we will design a BMPN workflow diagram and Spring Boot application that helps to manage the process as given below:
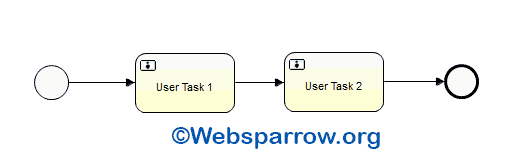
After that, we will create a list of employees and store their details into the database using Spring JPA and by calling Activiti API we assign the task to an employee. An employee will complete their first task and the second task.
Similar Post:
2. Technologies Used
Find the list of all technologies used in this application.
- Spring Tool Suite 3
- JDK 8
- Spring Boot 1.5.3.RELEASE
- Activiti 5.22.0
- H2 (in-memory) Database
- Spring JPA
Activiti workflow process engine uses the H2 in-memory database to manage the process id, task id, etc but we can also configure the external database like MySQL, Oracle, etc in the application.properties file.
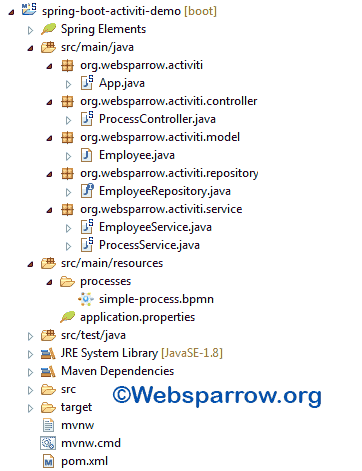
3. Project Structure
Final project structure of our application in STS ide will look like as follows:
4. Dependencies Required
These following dependencies are required to work with Spring Boot + Activiti workflow process engine. Add the following to your pom.xml.
<properties>
	<java.version>1.8</java.version>
	<activiti.version>5.22.0</activiti.version>
</properties>
<dependencies>
	<dependency>
		<groupId>org.springframework.boot</groupId>
		<artifactId>spring-boot-starter-web</artifactId>
	</dependency>
	<dependency>
		<groupId>org.activiti</groupId>
		<artifactId>activiti-spring-boot-starter-basic</artifactId>
		<version>${activiti.version}</version>
	</dependency>
	<dependency>
		<groupId>org.activiti</groupId>
		<artifactId>activiti-spring-boot-starter-jpa</artifactId>
		<version>${activiti.version}</version>
	</dependency>
	<dependency>
		<groupId>com.h2database</groupId>
		<artifactId>h2</artifactId>
	</dependency>
</dependencies>
5. BPMN Process Definition
Drop the BPMN 2.0 process definition into the src/main/resources/processes folder. All processes placed here will automatically be deployed (ie. parsed and made to be executable) to the Activiti engine. The process definition file extension can be bpmn20.xml or bpmn like simple-process.bpmn20.xml or simple-process.bpmn.
<?xml version="1.0" encoding="UTF-8"?>
<definitions xmlns="http://www.omg.org/spec/BPMN/20100524/MODEL" xmlns:xsi="http://www.w3.org/2001/XMLSchema-instance" xmlns:xsd="http://www.w3.org/2001/XMLSchema" xmlns:activiti="http://activiti.org/bpmn" xmlns:bpmndi="http://www.omg.org/spec/BPMN/20100524/DI" xmlns:omgdc="http://www.omg.org/spec/DD/20100524/DC" xmlns:omgdi="http://www.omg.org/spec/DD/20100524/DI" typeLanguage="http://www.w3.org/2001/XMLSchema" expressionLanguage="http://www.w3.org/1999/XPath" targetNamespace="Examples">
  <process id="simple-process" name="Simple Process" isExecutable="true">
    <startEvent id="start" name="Start"></startEvent>
    <userTask id="userTask1" name="User Task 1" activiti:assignee="${employee.name}">
      <documentation>Complete user task 1 first.</documentation>
    </userTask>
    <userTask id="userTask2" name="User Task 2" activiti:assignee="${employee.name}">
      <documentation>Work for the second task.</documentation>
    </userTask>
    <endEvent id="theEnd"></endEvent>
    <sequenceFlow id="flow1" sourceRef="userTask2" targetRef="theEnd"></sequenceFlow>
    <sequenceFlow id="flow3" sourceRef="userTask1" targetRef="userTask2"></sequenceFlow>
    <sequenceFlow id="flow4" sourceRef="start" targetRef="userTask1"></sequenceFlow>
  </process>
</definitions>
The activiti:assignee attribute and ${employee.name} expression are used for assigning the task to an employee.
6. Model and Repository Class
Create an Employee data model class.
package org.websparrow.activiti.model;

import javax.persistence.Entity;
import javax.persistence.GeneratedValue;
import javax.persistence.Id;

@Entity
public class Employee {

	@Id
	@GeneratedValue
	private Long id;
	private String name;
	private String designation;
// generate getters and setters...

	public Employee() {
	}

	public Employee(String name, String designation) {

		this.name = name;
		this.designation = designation;
	}
}
Create EmployeeRepository interface which extends the JpaRepository<T, ID> interface and define a method findByName(String name) of Employee return type to search the employee from the database.
package org.websparrow.activiti.repository;

import org.springframework.data.jpa.repository.JpaRepository;
import org.websparrow.activiti.model.Employee;

public interface EmployeeRepository extends JpaRepository<Employee, Long> {

	public Employee findByName(String name);

}
7. Service Class
The EmployeeService class is responsible for adding employees into the database. This service class will be called when the application is started.
package org.websparrow.activiti.service;

import org.springframework.beans.factory.annotation.Autowired;
import org.springframework.stereotype.Service;
import org.websparrow.activiti.model.Employee;
import org.websparrow.activiti.repository.EmployeeRepository;

@Service
public class EmployeeService {

	@Autowired
	private EmployeeRepository employeeRepository;

	// create the list of Employees into the database who perform the task
	public void createEmployee() {

		if (employeeRepository.findAll().size() == 0) {

			employeeRepository.save(new Employee("Prince", "Software Enginner"));
			employeeRepository.save(new Employee("Gaurav", "Technical Lead"));
			employeeRepository.save(new Employee("Abhinav", "Test Lead"));
		}
	}
}
And the ProcessService class is responsible for starting the process, assigning a task to an employee, retrieving the tasks assigned to an employee, and completing a particular task by id.
package org.websparrow.activiti.service;

import java.util.HashMap;
import java.util.List;
import java.util.Map;

import org.activiti.engine.RepositoryService;
import org.activiti.engine.RuntimeService;
import org.activiti.engine.TaskService;
import org.activiti.engine.task.Task;
import org.springframework.beans.factory.annotation.Autowired;
import org.springframework.stereotype.Service;
import org.websparrow.activiti.model.Employee;
import org.websparrow.activiti.repository.EmployeeRepository;

@Service
public class ProcessService {

	@Autowired
	private EmployeeRepository employeeRepository;

	@Autowired
	private RuntimeService runtimeService;

	@Autowired
	private TaskService taskService;

	@Autowired
	private RepositoryService repositoryService;

	// start the process and set employee as variable
	public String startTheProcess(String assignee) {

		Employee employee = employeeRepository.findByName(assignee);

		Map<String, Object> variables = new HashMap<>();
		variables.put("employee", employee);

		runtimeService.startProcessInstanceByKey("simple-process", variables);

		return processInformation();
	}

	// fetching process and task information
	public String processInformation() {

		List<Task> taskList = taskService.createTaskQuery().orderByTaskCreateTime().asc().list();

		StringBuilder processAndTaskInfo = new StringBuilder();

		processAndTaskInfo.append("Number of process definition available: "
				+ repositoryService.createProcessDefinitionQuery().count() + " | Task Details= ");

		taskList.forEach(task -> {

			processAndTaskInfo.append("ID: " + task.getId() + ", Name: " + task.getName() + ", Assignee: "
					+ task.getAssignee() + ", Description: " + task.getDescription());
		});

		return processAndTaskInfo.toString();
	}

	// fetch task assigned to employee
	public List<Task> getTasks(String assignee) {
		return taskService.createTaskQuery().taskAssignee(assignee).list();
	}

	// complete the task
	public void completeTask(String taskId) {
		taskService.complete(taskId);
	}
}
8. Controller Class
The ProcessController class handles the HTTP request, call the respective ProcessService class method, and response the specific result.
package org.websparrow.activiti.controller;

import java.util.List;

import org.activiti.engine.task.Task;
import org.springframework.beans.factory.annotation.Autowired;
import org.springframework.web.bind.annotation.RequestMapping;
import org.springframework.web.bind.annotation.RequestParam;
import org.springframework.web.bind.annotation.RestController;
import org.websparrow.activiti.service.ProcessService;

@RestController
public class ProcessController {

	@Autowired
	private ProcessService processService;

	/*
	 * Method will start the Activiti process engine and set employee to perform
	 * the task
	 */
	@RequestMapping(value = "/process")
	public String startProcessInstance(@RequestParam String assignee) {
		return processService.startTheProcess(assignee);
	}

	// Retrieve the tasks assigned to an employee
	@RequestMapping(value = "/tasks")
	public String getTasks(@RequestParam String assignee) {
		List<Task> tasks = processService.getTasks(assignee);
		return tasks.toString();
	}

	// Complete the task by their ID
	@RequestMapping(value = "/completetask")
	public String completeTask(@RequestParam String taskId) {
		processService.completeTask(taskId);
		return "Task with id " + taskId + " has been completed!";
	}
}
9. Run the application
Finally, create an App class which calls EmployeeSerice‘s createEmployee() method for creating employees while starting the application.
package org.websparrow.activiti;

import org.springframework.boot.CommandLineRunner;
import org.springframework.boot.SpringApplication;
import org.springframework.boot.autoconfigure.SpringBootApplication;
import org.springframework.context.annotation.Bean;
import org.websparrow.activiti.service.EmployeeService;

@SpringBootApplication
public class App {

	public static void main(String[] args) {
		SpringApplication.run(App.class, args);
	}

	@Bean
	public CommandLineRunner init(final EmployeeService employeeService) {

		return new CommandLineRunner() {
			public void run(String... strings) throws Exception {
				employeeService.createEmployee();
			}
		};
	}
}
To secure your application with user id and password, add the following code in the App class.
@Bean
InitializingBean usersAndGroupsInitializer(final IdentityService identityService) {

	return new InitializingBean() {
		public void afterPropertiesSet() throws Exception {

			Group group = identityService.newGroup("user");
			group.setName("users");
			group.setType("security-role");
			identityService.saveGroup(group);

			User admin = identityService.newUser("admin");
			admin.setPassword("admin");
			identityService.saveUser(admin);
		}
	};
}
10. Test the application
Now it’s time to test the application. To do that build your application using Maven command clean install and run App class via Spring Boot App. After that following the below steps:
Step 1: Assign a task to an employee (Prince)
http://localhost:8080/process?assignee=Prince
Number of process definition available: 1 | Task Details= ID: 9, Name: User Task 1, Assignee: Prince, Description: Complete user task 1 first.Step 2: Show the task assigned to Prince
http://localhost:8080/tasks?assignee=Prince
[Task[id=9, name=User Task 1]]Step 3: Complete the task assigned to Prince by task id.
http://localhost:8080/completetask?taskId=9
Task with id 9 has been completed.Step 4: Again check the task assigned to Prince
http://localhost:8080/tasks?assignee=Prince
[Task[id=12, name=User Task 2]]Step 5: Complete the task again
http://localhost:8080/completetask?taskId=12
Task with id 12 has been completed.Finally, Prince has been completed all tasks assigned to him, if you Step 2 again, it will return blank array [ ], it means there is no pending task in Prince bucket.
Download Source Code: spring-boot-activiti-workflow-example.zip
References
Similar Posts
- Spring Security JDBC authentication with Spring Boot
- Spring 5 MVC Java Based Configuration Example
- Spring Boot + RabbitMQ Example
- Spring AOP Before Advice example using XML configuration
- Spring autowiring using @Resource and @Inject annotation example
- Simplify Data Access with Spring’s @Repository Annotation
- Spring Boot– Consuming a REST Services with WebClient
- Difference Between @Component and @ComponentScan Annotations in Spring Boot
- How to convert a Spring Boot JAR Application to a WAR
- Spring Boot Dynamic DataSource Routing using AbstractRoutingDataSource