Spring Boot + FreeMarker Example
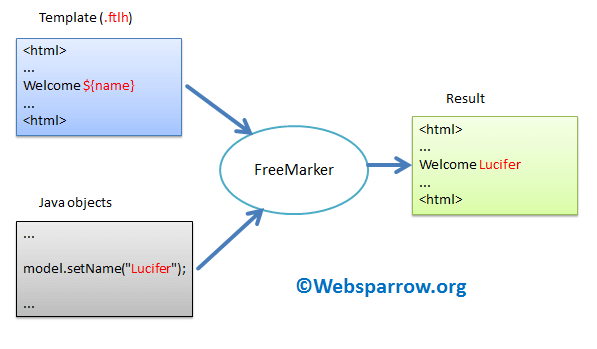
In this article, we’ll integrate the Spring Boot and FreeMarker. FreeMarker is a template engine (Java library) to generate the dynamic webpage. FreeMarker is developed by Apache Sofware Foundation and it’s open-source.
FreeMarker follows the MVC (Model View Controller) and popular for dynamic web pages to generate text output (HTML web pages, e-mails, configuration files, source code, etc.). FreeMarker templates are written in the FreeMarker Template Language (FTL) and used the .ftlh extension for the template file.
Note: Spring Boot recently changed the default extension from
.ftlto.ftlh.
To integrate and work with the FreeMarker template engine with Spring Boot application, followings steps are required:
- Add the FreeMaker dependency to the project classpath
- Configure the template location and suffix (file extension) to the application.properties
- Design your template and put a placeholder where data will change dynamically e.g. Welcome
${name} - And in the last, call your template and pass the prepare data to be populated in the template
Let’s get started step by step.
Technology Used
Find the list of all tools/technologies used in this application.
- Spring Tool Suite 4
- JDK 8
- Spring Boot 2.2.6.RELEASE
- FreeMarker 2.3.30
- Maven 3.2
Dependencies Required
Add the following dependencies to the pom.xml to work with Spring Boot + FreeMarker.
<dependencies>
<dependency>
<groupId>org.springframework.boot</groupId>
<artifactId>spring-boot-starter-freemarker</artifactId>
</dependency>
<dependency>
<groupId>org.springframework.boot</groupId>
<artifactId>spring-boot-starter-web</artifactId>
</dependency>
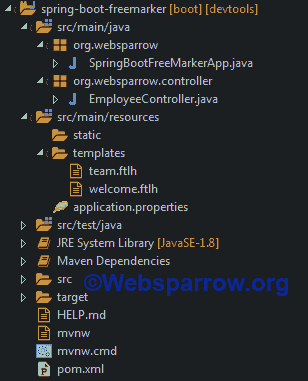
</dependencies>Project Structure
The final project structure of our application in STS 4 IDE will look like as follows:
Template Configuration
Configuration of template location and its extension will take place in the application.properties.
# Global configuration
server.port=8080

# FreeMarker configuration
spring.freemarker.template-loader-path=classpath:/templates
spring.freemarker.suffix=.ftlh
Controller & Template
In the controller class, we prepare data and send it to the respective template.
1. Send Single Value: This method takes your name from the path variable and sends it to the template. For example, you want to send a welcome message to the new joiners of the company.
@GetMapping("/{name}")
public ModelAndView welcome(@PathVariable String name) {
	ModelAndView mv = new ModelAndView();

	// Placeholders, later used in template file
	mv.addObject("name", name);
	mv.addObject("location", "India");

	// Template file name
	mv.setViewName("welcome");

	return mv;
}
The respective template:
<!DOCTYPE html>
<html>
<head>
<title>Welcome</title>
</head>
<body>
	<h3>Dear ${name},</h3>
	<p>A warm welcome and lots of good wishes on becoming part of our growing team.</p>
	<p>Regards</p>
	<p>Websparrow.org Team</p>
	<p>Location: ${location}</p>
</body>
</html>
2. Send List: This method takes your name from the path variable, prepare the list and sends it to the template. For example, you want to send the name of team members to the new joiners of the company to whom they will work.
@GetMapping("/{name}/team")
public ModelAndView findTeam(@PathVariable String name) {

	List<String> teamMembers = Arrays.asList("Jack", "Manish", "Lucy",
			"Dhirendra");

	ModelAndView mv = new ModelAndView();

	// Placeholders, later used in template file
	mv.addObject("name", name);
	mv.addObject("teamMembers", teamMembers);

	// template name
	mv.setViewName("team");

	return mv;
}
The respective template where we get and iterate the values:
<!DOCTYPE html>
<html>
<head>
<title>Team members</title>
</head>
<body>
	<h3>Dear ${name},</h3>

	<p>You are assigned to work with the following team members:</p>
	<ol>
		<#list teamMembers as teamMember>
			<li>${teamMember}</li>
		</#list>
	</ol>
</body>
</html>
Here is the complete controller class.
package org.websparrow.controller;

import org.springframework.stereotype.Controller;

@Controller
public class EmployeeController {

	@GetMapping("/employees/{name}")
	public ModelAndView welcome(@PathVariable String name) {
		ModelAndView mv = new ModelAndView();
		// Placeholders, later used in template file
		mv.addObject("name", name);
		mv.addObject("location", "India");
		// Template file name
		mv.setViewName("welcome");
		return mv;
	}

	@GetMapping("/employees/{name}/team")
	public ModelAndView findTeam(@PathVariable String name) {
		List<String> teamMembers = Arrays.asList("Jack", "Manish", "Lucy",
				"Dhirendra");
		ModelAndView mv = new ModelAndView();
		mv.addObject("name", name);
		mv.addObject("teamMembers", teamMembers);
		mv.setViewName("team");
		return mv;
	}
}
Run it
package org.websparrow;

import org.springframework.boot.SpringApplication;
import org.springframework.boot.autoconfigure.SpringBootApplication;

@SpringBootApplication
public class SpringBootFreeMarkerApp {

	public static void main(String[] args) {
		SpringApplication.run(SpringBootFreeMarkerApp.class, args);
	}
}
Test it
Start your application by executing the SpringBootFreeMarkerApp class and hit the following URL’s in your favourite browser one by one.
1. To greet the new joiners
URL – http://localhost:8080/employees/{name}
e.g. – http://localhost:8080/employees/Lucy

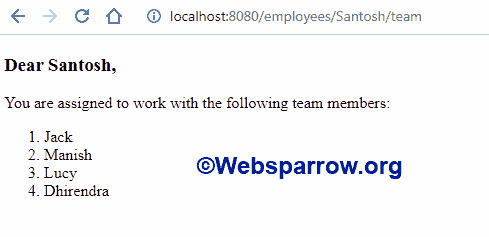
2. New joiners team member list
URL – http://localhost:8080/employees/{name}/team
e.g. – http://localhost:8080/employees/Santosh/team
Download Source Code: spring-boot-freemarker-example.zip