Spring MVC user registration and login example using JdbcTemplate + MySQL
This article will help you to understand how to create user registration and login example using Spring MVC, JdbcTemplate and MySQL database. Spring framework gives us the JdbcTemplate class to query with the database in its Spring JDBC module. It also provides the DriverManagerDataSource to create the database connection between the application and database. If you don’t know how to create a database connection, check out my Spring database connectivity article.
In this application, we create will create registration form so that user can register and their details will be stored into the database and a login form so that user can able to login into the application using their user id and password.
Technologies Used
Find the list of technologies, used in this application
- Eclipse Oxygen
- Tomcat 9
- JDK 8
- Maven 3
- Spring5.0.2.RELEASE
- MySQL Database
Dependencies Required
These are the required dependencies that must be your build path. To get all these dependencies all the following code in your pom.xml.
<dependencies>
	<!-- spring mvc dependency -->
	<dependency>
		<groupId>org.springframework</groupId>
		<artifactId>spring-webmvc</artifactId>
		<version>5.0.2.RELEASE</version>
	</dependency>
	<!-- spring jdbc dependency -->
	<dependency>
		<groupId>org.springframework</groupId>
		<artifactId>spring-jdbc</artifactId>
		<version>5.0.2.RELEASE</version>
	</dependency>
	<!-- mysql databse connector -->
	<dependency>
		<groupId>mysql</groupId>
		<artifactId>mysql-connector-java</artifactId>
		<version>6.0.6</version>
	</dependency>
</dependencies>
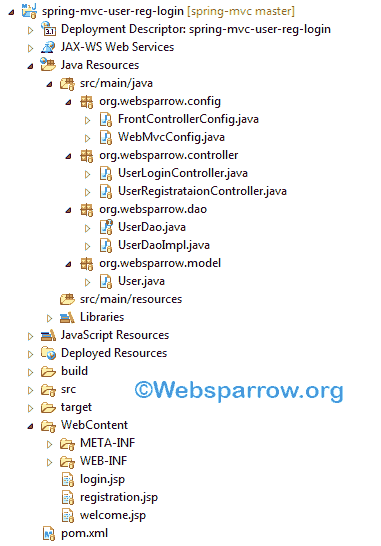
Project Structure
Final project structure of our application in Eclipse IDE will look like as follows.

Model Class
Create a model class of User that contains user information.
package org.websparrow.model;

public class User {

	// Generate Getters and Setters...
	private String userId, password;

}
DAO Class
Create the UserDao interface. It will contain the method signature.
package org.websparrow.dao;

import org.websparrow.model.User;

public interface UserDao {

	public int registerUser(User user);

	public String loginUser(User user);

}
Create another UserDaoImpl class that implements the UserDao interface and define the body of UserDao methods. This class will also instantiate the JdbcTemplate class by passing the DataSource object to query with the database.
package org.websparrow.dao;

import javax.sql.DataSource;

import org.springframework.jdbc.core.JdbcTemplate;
import org.websparrow.model.User;

public class UserDaoImpl implements UserDao {

	private JdbcTemplate jdbcTemplate;

	public UserDaoImpl(DataSource dataSoruce) {
		jdbcTemplate = new JdbcTemplate(dataSoruce);
	}

	@Override
	public int registerUser(User user) {

		String sql = "INSERT INTO USER_DATA VALUES(?,?)";

		try {

			int counter = jdbcTemplate.update(sql, new Object[] { user.getUserId(), user.getPassword() });

			return counter;

		} catch (Exception e) {
			e.printStackTrace();
			return 0;
		}
	}

	@Override
	public String loginUser(User user) {

		String sql = "SELECT USER_ID FROM USER_DATA WHERE USER_ID=? AND USER_PASS=?";

		try {

			String userId = jdbcTemplate.queryForObject(sql, new Object[] {
					user.getUserId(), user.getPassword() }, String.class);

			return userId;

		} catch (Exception e) {
			return null;
		}
	}
}
Note: If the
loginUsermethod will not be surrounded by the try-catch block then thequeryForObjectmethod ofJdbcTemplateclass will throw an exception if it is not found any user id into the database.org.springframework.dao.EmptyResultDataAccessException: Incorrect result size: expected 1, actual 0 at org.springframework.dao.support.DataAccessUtils.nullableSingleResult(DataAccessUtils.java:97) at org.springframework.jdbc.core.JdbcTemplate.queryForObject(JdbcTemplate.java:772) at org.springframework.jdbc.core.JdbcTemplate.queryForObject(JdbcTemplate.java:792) at org.websparrow.dao.UserDaoImpl.loginUser(UserDaoImpl.java:40)
You can use the queryForList method as an alternative to fetch the user id from the database.
List<String> users = jdbcTemplate.queryForList(sql, new Object[] { user.getUserId(), user.getPassword() },String.class);
if (users.isEmpty()) {
	return null;
} else {
	return users.get(0);
}
Front Controller & MVC Configuration
I have used annotation based configuration, so the front controller class will be:
package org.websparrow.config;

import org.springframework.web.servlet.support.AbstractAnnotationConfigDispatcherServletInitializer;

public class FrontControllerConfig extends AbstractAnnotationConfigDispatcherServletInitializer {

	@Override
	protected Class<?>[] getRootConfigClasses() {

		return new Class[] { WebMvcConfig.class };
	}

	@Override
	protected Class<?>[] getServletConfigClasses() {

		return null;
	}

	@Override
	protected String[] getServletMappings() {

		return new String[] { "/" };
	}

}
And the Spring MVC configuration class will be given below. In this class, we will create a database connection, intantiate the UserDao and InternalResourceViewResolver.
package org.websparrow.config;

import org.springframework.context.annotation.Bean;
import org.springframework.context.annotation.ComponentScan;
import org.springframework.context.annotation.Configuration;
import org.springframework.jdbc.datasource.DriverManagerDataSource;
import org.springframework.web.servlet.config.annotation.EnableWebMvc;
import org.springframework.web.servlet.view.InternalResourceViewResolver;
import org.websparrow.dao.UserDao;
import org.websparrow.dao.UserDaoImpl;

@Configuration
@EnableWebMvc
@ComponentScan("org.websparrow")
public class WebMvcConfig {

	@Bean
	InternalResourceViewResolver viewResolver() {

		InternalResourceViewResolver vr = new InternalResourceViewResolver();

		vr.setPrefix("/");
		vr.setSuffix(".jsp");
		return vr;

	}

	@Bean
	DriverManagerDataSource getDataSource() {
		DriverManagerDataSource ds = new DriverManagerDataSource();
		ds.setDriverClassName("com.mysql.jdbc.Driver");
		ds.setUrl("jdbc:mysql://localhost:3306/websparrow");
		ds.setUsername("root");
		ds.setPassword("");

		return ds;

	}

	@Bean
	public UserDao getUserDao() {
		return new UserDaoImpl(getDataSource());
	}

}
Controller Class
UserRegistrataionController class is responsible for handling the user registration process. It will collect the user information and store it into the database.
package org.websparrow.controller;

import org.springframework.beans.factory.annotation.Autowired;
import org.springframework.stereotype.Controller;
import org.springframework.web.bind.annotation.RequestMapping;
import org.springframework.web.bind.annotation.RequestMethod;
import org.springframework.web.bind.annotation.RequestParam;
import org.springframework.web.servlet.ModelAndView;
import org.websparrow.dao.UserDao;
import org.websparrow.model.User;

@Controller
public class UserRegistrataionController {

	@Autowired
	private UserDao userDao;

	@RequestMapping(value = "/register", method = RequestMethod.POST)
	public ModelAndView userRegistration(@RequestParam("userId") String userId,
			@RequestParam("password") String password) {

		ModelAndView mv = new ModelAndView();

		User user = new User();
		user.setUserId(userId);
		user.setPassword(password);

		int counter = userDao.registerUser(user);

		if (counter > 0) {
			mv.addObject("msg", "User registration successful.");
		} else {
			mv.addObject("msg", "Error- check the console log.");
		}

		mv.setViewName("registration");

		return mv;

	}

}
UserLoginController class is responsible for handling the user login process. It will fetch the user information from the database and display it on the JSP page.
package org.websparrow.controller;

import org.springframework.beans.factory.annotation.Autowired;
import org.springframework.stereotype.Controller;
import org.springframework.web.bind.annotation.RequestMapping;
import org.springframework.web.bind.annotation.RequestMethod;
import org.springframework.web.bind.annotation.RequestParam;
import org.springframework.web.servlet.ModelAndView;
import org.websparrow.dao.UserDao;
import org.websparrow.model.User;

@Controller
public class UserLoginController {

	@Autowired
	private UserDao userDao;

	@RequestMapping(value = "/login", method = RequestMethod.POST)
	public ModelAndView userLogin(@RequestParam("userId") String userId, @RequestParam("password") String password) {

		ModelAndView mv = new ModelAndView();

		User user = new User();
		user.setUserId(userId);
		user.setPassword(password);

		String name = userDao.loginUser(user);

		if (name != null) {

			mv.addObject("msg", "Welcome " + name + ", You have successfully logged in.");
			mv.setViewName("welcome");

		} else {

			mv.addObject("msg", "Invalid user id or password.");
			mv.setViewName("login");
		}

		return mv;

	}

}
JSP Page
registration.jsp – It contains the registration form.
<%@ page isELIgnored="false"%>
<html>
<head>
<title>Spring MVC user registration and login example using JdbcTemplate + MySQL</title>
</head>
<body>
	<h3>Spring MVC user registration and login example using JdbcTemplate + MySQL</h3>

	<form action="register" method="post">
		<pre>
	    <strong>Register Here | <a href="login.jsp">Click here to Login</a></strong>

		User Id: <input type="text" name="userId" />

		Password: <input type="password" name="password" />

		<input type="submit" value="Register" />
	</pre>
	</form>

	${msg}
</body>
</html>
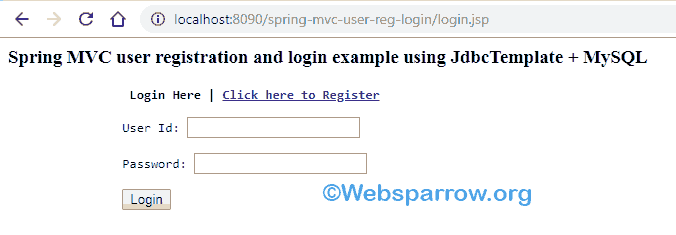
login.jsp – It contains the login form so that user can login.
<%@ page isELIgnored="false"%>
<html>
<head>
<title>Spring MVC user registration and login example using JdbcTemplate + MySQL</title>
</head>
<body>
	<h3>Spring MVC user registration and login example using JdbcTemplate + MySQL</h3>

	<form action="login" method="post">
		<pre>
		 <strong>Login Here | <a href="registration.jsp">Click here to Register</a></strong>

		User Id: <input type="text" name="userId" />

		Password: <input type="password" name="password" />

		<input type="submit" value="Login" />
		</pre>
	</form>
	${msg}
</body>
</html>
welcome.jsp – This page will display is username if and only if the user can successfully logged in.
<%@ page isELIgnored="false"%>
<html>
<head>
<title>Spring MVC user registration and login example using JdbcTemplate + MySQL</title>
</head>

<body>

	${msg}

</body>
</html>
Output
Run your application and hit the below URL in your browser address bar to register a new user:
URL: http://localhost:8090/spring-mvc-user-reg-login/registration.jsp

For login, URL will be:
URL: http://localhost:8090/spring-mvc-user-reg-login/login.jsp

If the user successfully logged in, you will be redirected to the welcome page and will display the following message.
Welcome atulrai, You have successfully logged in.References
- How to fetch data from database in Spring MVC
- Spring MVC Database Connectivity using XML Configuration
- Spring MVC Database Connectivity Example using Annotation and Java Based Configuration
Download Source Code: spring-mvc-user-registration-and-login-example-using-jdbctemplate-mysql.zip