How to upload Image in database using Struts 2
In this tutorial, we are going to explain how to Upload/Insert images in the database using Struts 2. First of all, we will add the enctype="multipart/form-data" attribute in the form tag. The enctype attribute specifies how the form-data should be encoded when submitting it to the server.
Note:The enctype attribute can be used only if method=”post”.
Software Used
- Eclipse IDE
- MySQL Database
- JDK 8
- Tomcat 8
Required JARS
To upload the image in database these JARS are required.
- All struts 2 core jars
- commons-fileupload-x.x.x.jar
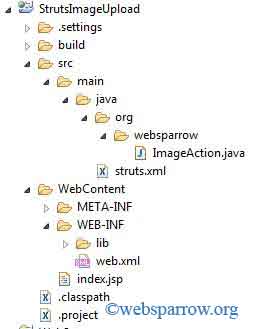
Project Structure in Eclipse
Step 1: The very first step is to create a table in the database to store the data and datatype of image column must be BLOB.
 CREATE TABLE `image_upload` (
  `id` INT(5) NOT NULL AUTO_INCREMENT,
  `name` VARCHAR(20) DEFAULT NULL,
  `image` BLOB,
  PRIMARY KEY (`id`)
) ;
Step 2: Add the struts 2 filters in web.xml.
Step 3: Create the Action Class to handle the data. In my case, we have created the database Connection in same class.
package org.websparrow;

import java.io.File;
import java.io.FileInputStream;
import java.sql.Connection;
import java.sql.DriverManager;
import java.sql.PreparedStatement;

import com.opensymphony.xwork2.ActionSupport;

public class ImageAction extends ActionSupport {
	private String name;
	private File image;
	private String msg;

	// create database connection
	public static Connection connect() throws Exception {
		Class.forName("com.mysql.jdbc.Driver");
		return (Connection) DriverManager.getConnection("jdbc:mysql://127.0.0.1:3306/websparrow", "root", "");
	}

	@Override
	public String execute() {
		try {
			PreparedStatement preparedStatement = connect().prepareStatement("INSERT INTO IMAGE_UPLOAD(NAME,IMAGE) VALUES(?,?)");
			preparedStatement.setString(1, name);
			// for inserting image in database
			FileInputStream inputStream = new FileInputStream(image);
			preparedStatement.setBinaryStream(2, inputStream);
			int i = preparedStatement.executeUpdate();
			setName("");
			if (i > 0) {
				setMsg("Image successfully inserted.");
			} else {
				setMsg("Something gone wrong.");
			}
		} catch (Exception e) {
			e.printStackTrace();
		}
		return "SUCCESS";
	}

	public String getName() {
		return name;
	}

	public void setName(String name) {
		this.name = name;
	}

	public File getImage() {
		return image;
	}

	public void setImage(File image) {
		this.image = image;
	}

	public String getMsg() {
		return msg;
	}

	public void setMsg(String msg) {
		this.msg = msg;
	}
}
Step 4: Map the action in struts.xml
<?xml version="1.0" encoding="UTF-8" ?>
<!DOCTYPE struts PUBLIC
"-//Apache Software Foundation//DTD Struts Configuration 2.0//EN"
"http://struts.apache.org/dtds/struts-2.0.dtd">
<struts>
	<constant name="struts.devMode" value="true" />
	<package name="default" extends="struts-default" namespace="/">
		<action name="imageupload" class="org.websparrow.ImageAction">
			<result name="SUCCESS">/index.jsp</result>
		</action>
	</package>
</struts>
Step 5: User interface page
<%@taglib uri="/struts-tags" prefix="s"%>
<!DOCTYPE html>
<html>
<head>
<title>Struts 2 image insert example- Websparrow.org</title>
</head>
<body style="background-color: #f8f8f8; margin-left: 200px; margin-top: 40px; font-size: 25px;">

	<h1>Struts 2 image insert example</h1>

	<s:form action="imageupload" method="POST" enctype="multipart/form-data">
		<s:textfield name="name" label="Name" maxlength="20" />
		<s:file name="image" label="Select Image" />
		<s:submit name="sumbit" value="Submit" />
	</s:form>

	<div style="margin-top: 40px; font-size: 30px; color: green;">
		<s:property value="msg" />
	</div>

</body>
</html>
Output:
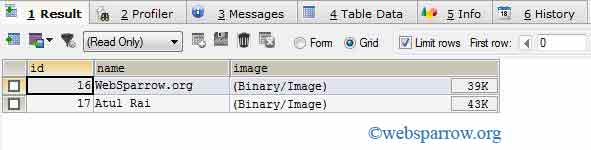
Now you are all done. Run your application and check the table in the database.
Screen 1
Screen 2
Download Source Code – how-to-upload-image-in-database-using-struts2.zip